Thursday, August 23, 2012

Photo Filter Window Treatment

Here is a quickie window treatment idea using tulle and photo filter swatchbooks for situations in which you'd like the light to pour in, but the view outside is nothing special. I got these swatchbooks of photo filters for free from someone who worked in a television station, but you can score your own for just a few bucks. Each swatchbook includes a wide array of colored polyester filters.

GamColor standard swatchbook - 4.5 x 1.5 ($4.50)

Musson - they say to call or stop by their showroom for a free swatchbook

I decided on a color palette and then mixed and matched filters from the two swatchbooks. To preserve the hole in each filter sheet, I sawed through the plastic bolts that holds the swatchbooks together. A single stitch through the hole secures each filter to the tulle curtain.

The new colored filter window treatment
The windowsill and interior edges of the window have been painted a pearlescent blue in accord with the new color palette.


Sunday, August 19, 2012

The Great Lavender Harvest of 2012

In the fall I travel to the high plains of Colorado for the chautauqua and while there reap the bounty of the lavender harvest. The two lavender-related projects below were a multisensory, uber-aromatic hit.

Drying the lavender

In all cases, whether making simple sachets or tackling fairy cakes, preparations begin with harvesting and drying the lavender. If you're using the lavender for baking, make sure it has not been sprayed with any chemicals. Once the lavender is dry, remove the flowers from the twiggy branches. Save the twigs and strew them along walkways and garden paths. Passers-by will get a pleasant aromatic surprise with each footstep.

Lavender Bath Bombs
Toss a lavender bath bomb into the tub and luxuriate in lavender-scented steam, taking advantage of the herb's soothing effect on the nerves and salubrious effect on the skin.

Lavender bath infusion (click on image to enlarge and read label)

The materials used couldn't be simpler: coffee filters and dental floss.

Materials needed

Put a couple of hefty pinches of lavender in the middle of a coffee filter, tie off the bundle with dental floss, and fluff out the edges of the coffee filter so that it looks like a large white flower. If you like, print out a sheet of labels and cut them out free-hand as shown below. Loop the narrow tab around the neck of your bath bomb and secure with a dab of glue.

Cut labels out free-hand

Bombs away
Lavender Fairy Cakes
Who doesn't think of fairies in relation to lavender? While fairy cakes are popular in England and Australia, they're relatively unknown in the United States. The recipe below represents a happy accident that occurred when converting grams to cups and making a few mistakes along the way. The result is an entirely original and wonderfully light, spongy little fairy cake.

Lavender fairy cakes

Step One: Lavender Sugar
This is a nice little project in its own right and while you'll need this sugar to make the fairy cakes, jars of lavender sugar could make a nifty gift accompanied by the fairy cake recipe.
• 1 cup caster sugar (a much finer grind than granulated; look for C&H Baking Sugar in a container that looks like a milk carton, found in most supermarkets in the baking section)
• 2 Tbs. dried lavender
Combine caster sugar and dried lavender in a food grinder, coffee mill, blender, whatever. Grind together until lavender is thoroughly mixed in. While some advise waiting a week to use the sugar until the lavender has thoroughly permeated the mix, I've found it works just fine immediately. Store sugar in cool dark place and it will keep for up to a year.

Step Two: Fairy Cakes
Makes about 36 tiny cupcakes
Preheat oven to 400 degrees Fahrenheit
Combine the following ingredients and mix with egg beater, or on very low setting in a mixer, for 2 to 3 minutes:
• 1/2 cup self-raising flour (make sure it's self-raising!)
• 1/2 cup softened unsalted butter
• 1/2 cup lavender sugar
• 2 eggs
Then add and mix a little more to create a smooth batter:
• 3 Tbs. milk
Use mini cupcake baking tins, and line tins with little paper cases. Fill the cases no more than 2/3 full with batter.
Bake for 10 to 11 minutes until top is springy to the touch. These stay light colored - they don't turn brown.
Remove from oven and let rest in tin for about five minutes, then turn out onto cooling rack to cool completely. Meanwhile, make the icing.

Step Three: Icing
The icing is thin and dribbly and may run off the top and down the sides.
• 1/2 cup icing sugar (powdered sugar)
• 1 Tbs. warm water (use a little more to make icing runny as needed)
Create violet food coloring by mixing a few drops of red and blue food coloring. Test color by flicking a drop into a glass of clear water and adjust as needed. Add coloring to icing a drop at a time until you have a pale lavender color.
Ice the fairy cakes. Garnish with a tiny sprig of fresh lavender.
Again, all lavender used should be free of chemical sprays.

Guaranteed to blow the mind of even the most discriminating fairy

Tuesday, August 14, 2012

In Case of Emergency, Gut the Bunny

Hiding, secrets, and all of the deliciously covert maneuvers of childhood are incorporated in this piece involving an altered, hitherto innocent, stuffed animal.

Materials: Stuffed animal for fifty cents scored at a garage sale; scraps of fabric from a second-hand Tommy Bahama shirt that literally fell into pieces as I was wearing it (too much salt air?); embroidery floss; recycled little Trader Joe's tea mints tin; fragment from a rapidly disintegrating toddler's security blanket.

The original bunny (already slit from stem to stern — I just couldn't wait)

Altered facial expression using embroidery floss. Why so sad? It's not easy keeping secrets.

Altered torso

Gutting the bunny involved removing about half of the interior stuffing. Using scraps of the Tommy Bahama shirt, I created a simple pocket, shoved it into the bunny's interior, and blanket stitched around the edges. Two flaps from the Tommy Bahama shirt front were then sewn onto either side of the torso opening. 

Tin containing rare remnant of toddler's security blanket

Tin inserted into secret belly slit


Bunny with a secret

Monday, July 30, 2012

Early Xerox Art

Back in the days before personal computers and scanners, geeky artist types used to hang out around the Xerox machine and experiment with what the technology had to offer. One experiment involved moving the original while the machine was scanning (resulting in a wavy, ethereal Buddha series that is now lost to time). Another experiment involved running separations of an image through a color Xerox machine and building up a color image through a series of single-color print runs. Some store owners were friendly, some were not. I can remember one color Xerox machine blowing out its very expensive bulb over and over again.

The technique used for the image below is pretty basic and simply involves laying various 3D items on the glass. For some reason, you just don't get the same effect when you try this with scanning.

click on image to enlarge

Materials for this piece included: brass bowling trophy; rusted razor blades found on the railroad tracks; watch innards; metal crap found on street or railroad tracks.

Makes me want to run to the nearest Xerox store.

Tuesday, July 24, 2012

First Responder Jacket

Those of us who grew up with color pamphlets for underground bomb shelters on the end table in our neo-colonial suburban tract homes have an endless fascination with survival fantasies. I can remember starting a diary at age ten or so because hey, it happened to Anne Frank. This latest piece in an ongoing series of survival art (or artful survival) is a first responder jacket.

This upcycled thrift store find was a little blah until I started applying patches created from iron-on printer paper and images borrowed from Red Cross and Marine handbooks, and a circa 1950s pamphlet.

Jacket front: lower edge of the two front flaps have been sewn closed to create large pockets

Jacket back

The patches: I've decided that patches convey a gritty urban look to just about any article of clothing. Even patches of bunnies and puppies would look gritty from a distance. You may recognize some of the same images used for these patches from an earlier project, Survival Doll.

Back patch: creating primitive weapons

Back patch: creating a water filter using a pants leg

Making splints and slings

More weapons and CPR

Surviving an atomic blast

Applying a tourniquet

Because I may want to casually fling my jacket over the back of a chair, revealing the label, and because the original label no longer represents the garment, I also stitched a patch over the original label.

Patch covering label

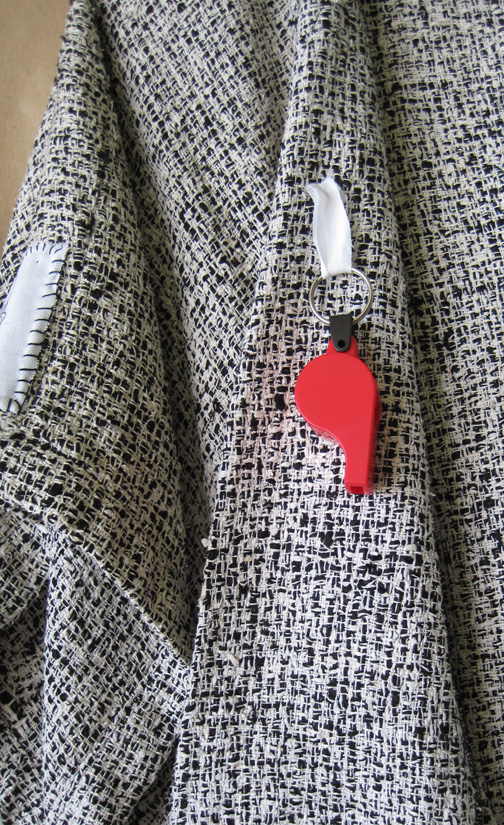
To confirm the fact that I'm the gal you want to be crouching under a table with when the earthquake hits, I've sewn an emergency whistle inside the lapel.

Emergency whistle
And finally, I've converted the front inside linings into hidden pockets to thwart bad guys who want to steal my stuff.

Hidden pockets

And a final thought for those tempted to take this seriously: If you lose your sense of humor there is really no point in surviving.

Saturday, July 21, 2012

The Traveling Shirt

This piece builds on an earlier post, Upcycled Shirt #12. The transformed man's shirt illustrated in that post essentially served as a blank canvas for an embroidery-on-the-road project. Those of you with itchy fingers will sympathize with the compelling need some of us have to keep those fingers occupied at all times. In the past this has led to frantic searches for embroidery thread in Vientiane, Laos, or a trip to the stationery store for a sketchpad and pencils in Ios, Greece. For this trip to Costa Rica I planned ahead and brought the materials with me: the upcycled shirt, a spool of white thread, and a sewing needle.

Look carefully to see embroidered sleeves (click on photo to enlarge)

The trick is that, because this is white-on-white, the embroidery whispers rather than shouts. This means you can wear the shirt while the embroidery is in progress and no one will notice. Whenever you get bored, thread a needle and start stitching away again. This traveling project has several advantages, not the least of which is that it doesn't require any extra room in your suitcase and serves as a wearable piece of clothing during every stage of the process and also doubles as a travel journal and/or birding list.


Close-up of embroidery

Close-up of embroidery


The original idea was to record bird sightings on the sleeves and to record impressions of people on the body of the shirt. However, a month-and-a-half after returning home I was still embroidering away on the sleeves and realized this was becoming less of a travel journal and more of a chore. So this traveling shirt stops at the sleeves which include over fifty bird sightings.  To embroider an entire shirt I estimate a trip would need to last at least three months (assuming you want to be enjoying your surroundings and not inside embroidering all the time).

Wednesday, July 4, 2012

Brown Bag Paper Beads

Wearing a jumble of recycled paper beads on my wrist the other day, the thought occurred to me that while making paper beads from recycled magazine pages is nice, why not use other recycled materials and make the beads a bit more elegant?

Paper bead bracelet made from recycled magazine pages. Nice but ho-hum.

Ironically, in the recycled world stepping up the elegance means shifting from glossy, multicolor magazine pages to more understated paper bags and gum wrappers. The result is a bracelet that looks exotic, serves as a more upscale accessory, and would be the perfect accompaniment to the classic little black dress.

The elegance of brown paper bags and gum wrappers.


For those who have never made paper beads before, the technique can be learned in about two minutes. Cut long, narrow triangles of paper. Roll them up starting from the narrow end towards the wide end. Secure the last bit with a daub of glue stick. Voila - a paper bead. Finish the bead by coating with something like Mod Podge. Put beads on a length of string or twine.

Materials
In this case, after the paper bead was made a small strip of paper from a used gum wrapper was glued around the circumference of the bead before the Mod Podge finish was applied.

Close-up of beads

Related Posts with Thumbnails