Showing posts with label upcycled. Show all posts

Monday, October 27, 2025

The Polka Dot Cure

 During a recent bout of self-imposed isolation due to my third time around with Covid, I came to an astonishing realization: Polka dots can cure just about anything, from food stains to floors to a very bad mood.

Polka Dot Fabric Patching

There's many a slip twist the fork and the frock.

If, like me and my friend Dawn, you favor natural fabrics but find that most every time you eat you drop something or other onto your clothing creating an indelible stain, this cure is for you. Below are three cotton shirts I "cured" for Dawn during a recent visit. To make these polka dot patches, see the how-to instructions included in the post, The Transitional Traveling Scarf.


The cure for food stains: polka dots!

Back

The beauty of this cure is that, as you continue to systematically destroy your garments, you can simply keep adding polka dots.

Front

Back

Tiny dots

To create tiny polka dots (the ones above are covering both stains and bleached-out areas), simply cut out a circular scrap of fabric, stitch around edge of circle, draw tight, and use the sewing needle to pick the poufy result into a flat circle shape. Using the same needle and thread, stitch directly onto garment.

Tiny dots

The back: polka dot with a sense of humor

Polka Dot Cure for Depression

Aside from their practical advantages, I have found that polka dots utilized for no practical reason whatsoever can offer a jolt of pure joy. I seldom begin a project with polka dots in mind, but if the project begins to look a little lackluster or boring I know the cure. Below are two recent projects in which polka dots were put into play with good effect.

Linen Shirt Upcycled from Aprons

Linen shirt with a dash of polka dots 

Back (and yes that is a pocket center back)

House Slippers Created From Upcycled Men's Shirts

This project, which involved winging it with no idea of what I was doing, took a very exciting turn when I realized I finally had a use for the leftover collars from upcycled thrift store man-tailored shirts. Here, it would take a sour outlook indeed to deny that the polka dots add a splash of added joy.

House slippers with polka dots

Even the pompoms, created from trimmings from the slipper seams, form a three-dimensional polka dot!

Pompom polka dots

 Polka Dot Floor Repair

I was in the midst of this polka dot craze when I enjoyed a brief retreat at Asilomar in Carmel, staying at the Julia Morgan-designed Scripps House. Imagine the giddy reaction when I looked down and spotted this gorgeous polka dot repair to the vintage wood flooring.

A wood floor polka dot repair

The Future of Polka Dots

The field of polka dot science and hands-on research is still in its early stages. Who knows how far this could go – from polka dot pothole repair transforming the crumbling infrastructure of our streets to a playful wonderland, to polka dot cuisine, polka dot auto body repair – the possibilities are endless.


Monday, June 9, 2025

Basic Thrift Store Shirt Butchering


The end product - a perfect shirt filet!

This time around the focus is on basic thrift store shirt butchery. The shirts in question are those endless racks of classic man-tailored shirts ideally suited for boring nine to five office jobs, found by the armload at any thrift store. They can generally be had for anywhere from $3 to $5 depending on the thrift store. That means you are getting lots and lots of lovely cotton fabric (check labels and avoid synthetics) far more cheaply than you'd pay at a fabric store, and you are keeping all of those shirts in circulation and out of the landfill.

To create a jigsaw pieced creation like the one above, pick at least three shirts in complementary hues, or in contrasting colors that appeal to you. Butchering a man's shirt involves removing all useable expanses of fabric and gutting and tossing the reinforced seams. You may want to save collars and cuffs for other projects (see Power Cuffs for another fun and fashionable project). Stream something online, grab your scissors, and make an evening of it!

Shirt butchering diagram

Keep the front button and button hole plackets intact – they can contribute interesting and unexpected details to your final creation. What you end up with after an enjoyable evening of shirt butchering is a lovely array of useable fabric. At that point, let the creative fun begin. 

The salvaged fabric

Try piecing the fabric together in a variety of different ways. The end product in this case is a short-sleeved shirt formed from a rectangle, which gives you lots of leeway to mess around.

Let the piecing begin!

One priority for me has always been pockets, and I found a number of ways to incorporate them into this new creation from the butchered parts. The top center pocket is actually a meta-pocket, incorporating the breast pocket that was on one of the original shirts, which is itself simply the exterior of another, larger pocket formed from a panel that includes a portion of the buttoned front placket of the original shirt. A button placket was used again for the lower right pocket.

Pockets, count 'em!

There is no limit to your creativity when it comes to shirt butchery. 

Shirt back

And finally, here is the shirt in action. . . shown on me in a spaced out moment in my living room.

Moi


Monday, March 25, 2024

Gritty Urban Interactive Wear: Alarmed!


Does this woman look alarmed?

Well she is!

This fashion statement was inspired by a little gadget called "She's Birdie," a personal safety alarm (pull the ring out and you have a 130 decibel siren and a flashing strobe light). If you've read the news about Oakland, California lately you know that we are teetering on the brink of civil collapse and in a state of lawlessness that rivals those old Westerns we all grew up on. However, the weather is nice and I can't imagine living anywhere else. I decided on a whim to invest in this little budget safety alarm and while I have no idea whether or not it would actually deter a thief I figured it could easily become part of an ambulatory interactive piece.

The Birdie

The first step was converting a prime thrift store find: a gray linen jacket with wonderful pockets but lacking any front closure. I snipped some fabric out of the back side of one pocket (replacing the missing section with scrap fabric) and stitched plackets onto the top front of the jacket to support buttonholes for a pair of vintage buttons.

Jacket front 

The next step was creating a template for the back lettering. I chose Bookman Old Style Font at 188pt, and printed out the letters and punctuation I needed on one 8.5x11 sheet.

Bookman Old Style 188pt

The printed letters were used as a cutting pattern on crafting felt, and the felt letters were then stitched onto the back of the jacket.

Jacket back

Stitched felt letters

More stitched felt letters!

My hopes and dreams for this piece may be overly ambitious. I envision a conversation with one of the many strangers I encounter on my ramblings about town.

Them: You are alarmed? What are you alarmed about?

Me: No, no, this is not a philosophical or political or emotional statement - although I would say if you are not alarmed about the current global situation you would have to be brain dead. This is a simple statement of fact. I am literally alarmed!

I then wave the Birdie dangling from my neck and a good laugh is had by all. Sometimes I even imagine having this conversation with an armed mugger wearing a hoodie. We will see how it goes.

Heading out...

Wednesday, February 28, 2024

Embroidering Blind Contour Drawings: The Sister Shirt

Blind contour drawings

Blind contour drawings are a fun, relaxing art exercise that supposedly improve your observation skills and hand-eye coordination. They can also make for some hilarious sessions with fellow artists. We've done several rounds of blind contour drawings on Zoom over the past few years since my sister and I formed a weekly maker group with her granddaughters during the pandemic. 

In our sessions, each of us chooses another person on the Zoom screen without telling anyone who we've chosen. We then start our drawing with the following rules: Don't lift your pen off the paper from start to finish; don't look down at what you are doing, just keep your eyes on the screen. After a set time period (about two minutes) we each show our drawings and the others guess the identity of the portrait subject.

The sister shirt (front)

During a gloomy interlude this winter featuring dark skies, damp chill, and atmospheric rivers, I searched through my closet for likely upcycling candidates and found this bright green linen thrift store find. Originally a long and frankly blah tunic with no pockets, the shirt was first transformed by cutting off a sizable portion of the bottom and converting those scraps into generous pockets. Vintage buttons from my collection embellished the piece.

Vintage buttons

Shirt back

The next step was to get my sometimes-hopelessly-spaced-out grandnieces and sister to send me their blind contour drawings. Once in hand I sorted through, picked out four, and transferred the drawings onto the shirt using carbon paper. The final step was stitching over the transferred drawings, adding "tethers" that extend to the bottom of the shirt so the heads look life floating balloons.

Blind drawing of Aleida by Nana

Blind drawing of Cici by Nana

Blind drawing of me by Nana

Blind drawing of Nana by Nana

You will note that all of the blind drawings used for the shirt were by the artist known as "Nana," my sister Judy, who has firmly and repeatedly identified herself as a non-artist. Blind contour drawing eliminates judgments and labels and allows everyone, no matter how they identify, to have big time fun. Nana's drawings were selected for this project because they simply suited the design best. The shirt is called the Sister Shirt because it depicts two sets of sisters, two generations apart.

A fun project from beginning to end.

Tuesday, August 29, 2023

Summer of Invention #3: Toe Bugs


The Problem

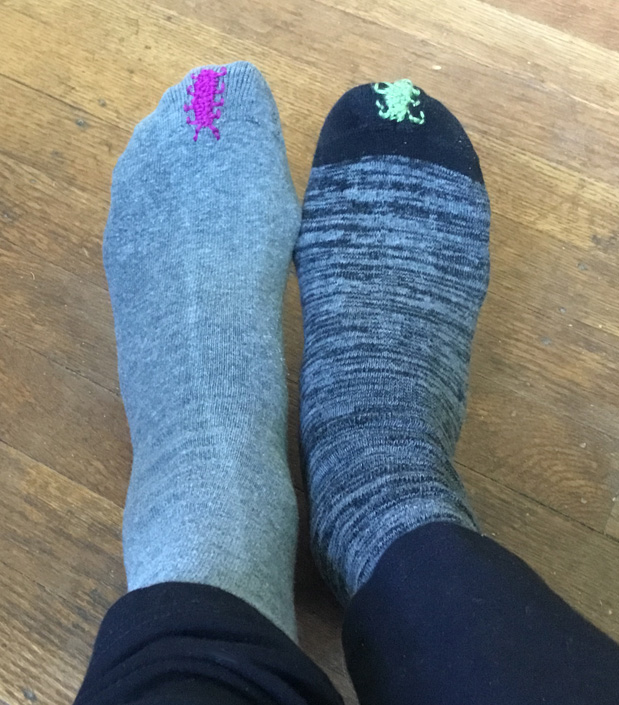
First let me say this isn't about the cost of a sock. This is about fighting back against the throw-away, out-of-control consumerism that has brought us to the brink of the apocalypse. It is also about combatting the emotional embarrassment of finding yourself at someone's house or, worse yet, a spiritual retreat in Ojai, where it becomes clear that the exception is that everyone is expected to remove their shoes. And it is about cute little bugs. It is a win-win scenario. Part of the Summer of Invention has been about tuning in to quotidian, annoying little problems that generally go unnoticed and figuring out how to fix them. 


A graphic take on problem identification: sock toe holes

The Solution


I have always wanted a darning egg for purely aesthetic fondling possibilities. I have never known how they are actually used. I ordered a cheap one online that came with darning needles and a set of embroidery thread. It arrived within 24 hours. The kit cost less than a good pair of socks.

The solution: a darning egg kit

I then spent about twenty minutes watching online how-to videos regarding darning and felt I had grasped the general idea.

The Toe Bugs


As a rank beginner when it comes to darning eggs, I found my first toe patch looked scraggly and had a couple of random bits sticking out. It looked sort of like a bug. This was the "aha" moment; I rethreaded the needle, went back in, and added a couple of legs and antenna. 

The first wonky toe bug

Colors that pop make for happy toe bugs


This is admittedly an invention far behind the times, a recycled invention from yesteryear. Which may be a lesson about thinking twice before you dispose of anything, including ideas.

Wednesday, August 9, 2023

Summer of Invention #2: Hot Water Bottle Babies


The bottle babies

I have felt an affinity for the late Queen Elizabeth ever since I read years ago that she would wander the cold and drafty hallways of Balmoral Castle clutching a hot water bottle to her tummy. Even though I live in Oakland, California, which has what Rand McNally has declared the best climate in the world, the foggy, rainy winters can chill you to the bone if you live in a 1920s apartment building with one iffy radiator. I have been cuddling hot water bottles during the winter months for years, but they weren't doing much for my sense of aesthetics, leaving me feeling like a frumpy old queen.

The bottles need a cover to be both safe (protecting you from a scalding hot bottle), removable, and washable. The covers they arrived in from Amazon do the job, but they are neutrally ho-hum at best, and quickly become tired and worn looking after multiple washings.


The bottles


Original covers

The solution? Upcycled thrift store infant onesies, scored for $1 each and adapted for use.

The end result

The hot water in the torso and fiber-filled arms and legs make the bottle extraordinarily comfortable, and the onesies can be easily removed using the front fasteners and tossed in the wash.

The how-to:

Click to enlarge

And there you have it, a pleasing and practical solution to a problem of royal proportions.

Official royal portrait

Close-up


Related Posts with Thumbnails