Showing posts with label jewelry. Show all posts

Friday, October 10, 2025

A Perfectly Ambiguous Protest Pin


Recently my friend Chris, with whom I eat sushi every Tuesday, announced that he had come up with the perfect protest pin: a simple message that questions, "Had enough?" I was thrilled when he gave me permission to use the idea, and settled on the two most readable color schemes for signage — red and black for one, blue and yellow for the other.

To craft the pins I used my standby tin-can-lid method (full instructions for do-it-yourself tin-can pins can be found in my Tin Can Frames Tutorial).


However, in the process of wielding my needle nose pliers to craft a few prototypes, while my fingers were occupied my mind had time to wander far and wide. I realized that, while my intent in making these was firmly anti-Trump and anti-fascist, the exact same pin might perfectly express the sentiments of those convinced they need to make America great again. For that matter, the pin could also work for members of all 12-step groups, for abused wives, for those fed up with crime in our cities, and for those trying to curb climate change by reducing consumption. 

I had unwittingly created the perfectly ambiguous protest pin, suitable for expressing the utter dissatisfaction of most every American about something or other. What does it say about a nation when all of its citizens are completely fed up — but disparate groups are sick unto death of entirely different things? Who knows? Certainly not me; I'm just cranking out art.

Suitable for most any dissatisfaction.

If you would like to join the confused masses and let the world know that you, too, have totally had it, make a batch of perfectly ambiguous protest pins and pass them around. If nothing else they may spark conversation across our different world views, which would be an accomplishment in itself.

The How-To


Use the link for the Tin Can Frames Tutorial to learn how to make a pin from a tin can lid, and use the following link for a free downloadable pdf of the Had Enough Pin Template, which offers a template for making six pins.

Had Enough Pin Template


Saturday, November 25, 2023

Peace, Love and Understanding: Papier Mâché Beads


 A week after the Hamas attack on Israel with tensions running high, global tension rising, and people finding even more reasons to fight the multi-front reality wars, I was in a Lyft car on my way to an 8-day Krishnamurti Retreat in Ojai. My Lyft driver, Abdulcadir, was friendly and curious and after questioning me about my destination and about Krishnamurti, he shared that he had his own daily spiritual practice. Every day he would write down a spiritual thought or principle, carry it with him, and periodically meditate on the principle throughout the day. We agreed that the basic ideas of kindness, gratitude and acceptance are common to all religions and spiritual belief systems, and were mutually baffled why the human species keeps turning on itself.

He reached for an old envelope on the front passenger seat that he used to record spiritual principles for his daily practice and handed it back to me, I asked if I could photograph it and he happily agreed.

Original envelope front


Envelope back

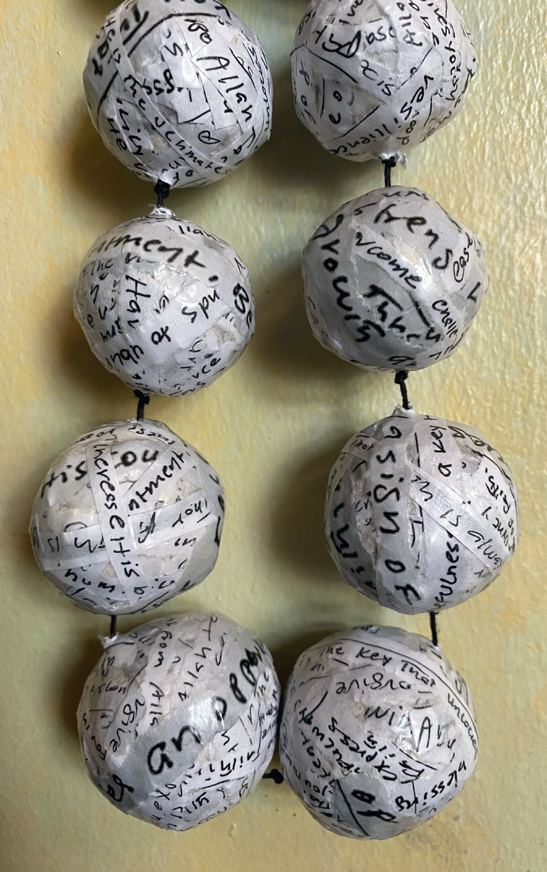
I have worked with paper mâché beads in the past to process life events, and have found it to be a deeply satisfying, slow meditative process over a period of days or weeks. The process of making these beads is outlined in an earlier post, Funerary Art: Souvenirs from the Bardo. When I returned home after the retreat, I reproduced scaled printouts of Abducadir's envelope to produce this beaded strand while the conflict in Gaza escalated.


It is hard to make sense of the world and of humanity itself in these troubled times. I do it with my hands. It helps. Talk to strangers. Be kind. Make stuff. 

Thursday, April 8, 2021

Roots Project: Passive Jewelry Piece #2


Courier necklace made with Reed Manna roots

For background on the greater, ongoing project, which involves various art experiments with native grass roots, see Roots Project. I have come to think of this second passive jewelry piece as an ephemeral courier necklace - an artifact from a nonexistent culture. I envision lithe, delicately limbed messengers wearing these fragile neckpieces running hither and yon, delivering the messages written within the rolled up paper beads.

The native grass root used here is Reed Mann, the roots carefully teased apart into long separate strands. The beads are made from Chinese good fortune paper.

Artifact from an unknown civilization

One more passive jewelry piece will be posted shortly. Then, with any luck, the active jewelry collaborations in which the roots have control and creative agency will enter their harvest phase.

At this point in the project, I realized I was on the right track when I woke up one morning with the urgent thought: I need to grow a pair of earrings!

Thursday, April 1, 2021

Roots Project: Passive Jewelry Piece #1

Bamboo root, Reed Manna root, bone


This Passive Jewelry series is the second stage in a series of experiments involving native grass roots (see The Roots Project). I have used the term "passive" to distinguish this series from a collaborative series currently in progress. In this passive series the roots are simply serving as materials; they play no active role in working collaboratively to create the jewelry.

This first piece was one of those happy accidents, introducing Lucky Bamboo (dracaena) root to the mix. I realized one of my Lucky Bamboo stalks had become root-bound in its container of water. I experimented, cut the lower portion of the stalk with the roots off entirely, and put the old stalk back in a fresh container of water (where it is surviving happily and madly sending off fresh roots). So - it turns out you can sustainably harvest Lucky Bamboo roots!

Lucky Bamboo (left), and Reed Manna 


The first step involved carefully teasing apart the Reed Manna clump into separate strands.

Reed Manna root

The Lucky Bamboo root had grown into a swirling circle in the confines of its water container, and this shape triggered the inspiration for the rest of the piece.

Lucky Bamboo root

Below, you can see the longest, strongest  Reed Manna roots teased out into workable strands. The ball, which was formed from shorter, weaker roots, was set aside for a later piece of jewelry. 

Necklace materials

It was possible to thread long strands of Reed Manna root onto an embroidery needle and stitch/loop it through the bamboo from either side, and then string on little tiny beads made out of bone, picked up long ago, somewhere or other.

Close-up: Roots and bone

And that brings us to the end of our narrative on this first root jewelry piece. Stay tuned.

The first root necklace

Thursday, May 17, 2018

Power Cuffs: Become a Fashionista Superhero!


Cuff-o-Rama!

I have fiddled around with cuffs before, recycling the cuffs from thrift store men's shirts and embellishing them (see examples here). My current cuff obsession, however, addresses a specific need: protecting and concealing bruised wrists. As one ages, skin gets thinner and more apt to tear and bruise, an unsightly inconvenience that is exacerbated if one also happens to be taking any kind of steroid medication.

Presented with this dilemma, one can choose to either look like a frail victim, or....opt for the role of fashion-forward superhero, in the spirit of Wonder Woman or the Black Panther. If you thought the Wakanda crossed-wrists chest thump was cool before, wait until you try it with cuffs.

For this series of cuffs I've utilized a range of materials and stitching techniques, identified in the photo captions below.

Recycled man's shirt cuffs, scraps of West African indigo, Japanese sashiko stitching.

Close-up.

Recycled truck inner tubes lined with scraps from recycled men's shirts, embellished with vintage buttons.

Buttery soft vinyl, top-stitched with spirals, lined with scraps from recycled men's shirts, and embellished with vintage buttons.

Close-up of spiral stitching.

Recycled man's shirt cuffs and scraps from another recycled shirt.

Close-up.
Just how powerful do these cuffs make you feel?

Very powerful.

I have never seen anyone else wearing anything like these, and they answer a very real need. They would also look fabulous as a fashion accessory for a twenty-year-old. Hell, they would look fabulous on Chadwick Boseman.

So cuff it up!


Thursday, April 5, 2018

Time to Go Outside: The Pin Version


Growing animal pins

For the first iteration of this idea and the back-story, see the previous post - Time to Go Outside: Living Jewelry. For the pin version I have used blackboard vinyl (see how you can use chalk on the vinyl below). The simple silhouette shapes of a cat head and a rabbit have been stitched along the perimeter but left open at the top so that you can insert a tab of homemade paper. The paper was produced by throwing junk mail and water into a blender and then embedding seeds in it once the blender mixture was slopped onto a drying screen.

I like the fact that they remind me vaguely of 1930's jewelry shapes, particularly the cat pin.

Bunny pin planted with wheat grass seeded paper

Bunny pin with added chalk drawing

I am showing the pins both blank and after they've been scribbled on a bit with chalk. This is the wonder of blackboard vinyl. It works just like a blackboard, and you can erase whatever you draw and then draw something else. I am wishing I had drawn a mean, evil bunny, and because it is blackboard vinyl, I can do that the next time I wear it.

Cat pin planted with cat grass seeded paper

Cat pin with chalk embellishment

Cat lovers will appreciate the fact that in addition to sending a green, "let's go outside" message, the cat grass is something cats love to nibble.

Delectable cat grass

That is it on growable jewelry for the moment. Time to go out and make some of your own. 

Thursday, September 14, 2017

Lost and Found: Brush Necklace


The found object: battered makeup brush lying in crosswalk

Time to give another found object a soul and send it on its way. For the back story on this ongoing project and the Japanese folk belief in tsukumogami, or objects with souls, see an earlier post —Tsukumogami: Objects with Souls. For more lost objects in the series see: Found.

I actually walked past this fabulous find in the middle of a crosswalk because I was heading towards a destination and absorbed in the quotidian task of crossing the street. Once I reached the opposite curb, however, it took about three seconds to decide I had to backtrack and grab this wonderful object. In addition to normal wear and tear it looked like it had been run over a couple of times, chipping the paint on the handle, denting the metal, and giving it a wonderful aged patina. Once home, after thoroughly washing it, I studied it for a while until its soul emerged. And here it is.

Brush necklace

The battered, abandoned brush is now a necklace with decidedly tribal overtones.

Close-up, brush head

Regarding the how-to:

The How: A

The How: B

The final step in any of the projects in the Lost and Found series is to send the object back out into the world to continue its travels. Friends fought me on this particular object, urging me to keep the necklace, but my mission is to shepherd lost objects along on their way, not to hoard them. A few objects back I started attaching a card or tag to the objects. Here is the copy for this one:

Card cover

Card inside

Card back (QR code leads directly to this blog)

Necklace with tag

And finally, it was time to let this object go. It was just released at the same crosswalk where it was originally found. I left it, walked to my local thrift store around the corner, and by the time I walked back it was gone.

The release

If you have an eye for detail, you may be wondering what happened to the brush handle. Be assured, I have plans and they are in progress. Stay tuned.

Thursday, October 29, 2015

Roller Skate Key Necklace


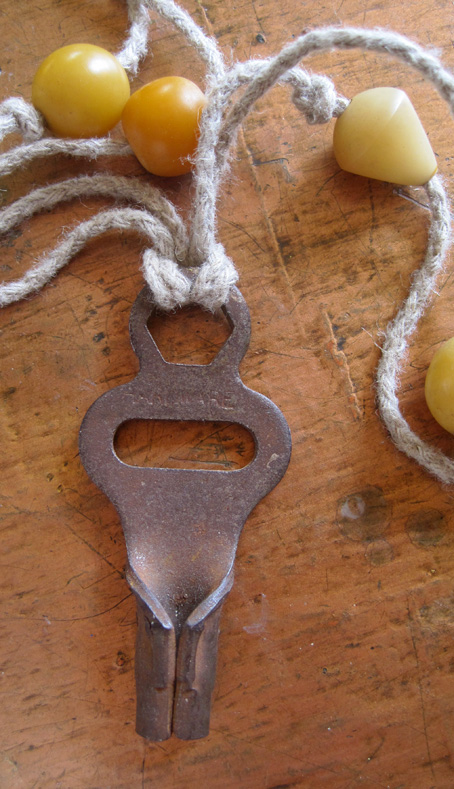
(fine print on key reads "hardware")

Here's a reminder to keep both your eyes and mind open the next time you are scrabbling through a junk box at your local flea market. This score was actually one of two roller skate keys, the only roller skate keys in the vicinity or in all of the universe as far as I knew, displayed on the palm of a fellow buyer's hand who wanted to show me his find. I was so effusive and my voice so full of longing that he very kindly gave me one of them. The cost, when I took it to the register, was just twenty-five cents.

Roller skate key necklace

It is now part of a very simple necklace and currently one of my favorite pieces of jewelry. Anyone my age who spots it around my neck remembers the old adjustable metal roller skates that fit around the soles of your shoes and that feeling of mechanical competence and no-nonsense, can-do attitude that possession of a roller skate key guaranteed. When they spot the key around my neck they exclaim, "Awwww..." in the tone of voice usually reserved for the first sighting of an adorable puppy. As for millenials and their ilk who have absolutely no idea what this object is: screw 'em, they can make necklaces out of nostalgic junk from their own pasts.

Don't you wish you had one?


Monday, July 20, 2015

Playing with Corn Husk Creations


Corn husk flower

In the past I've made corn husk dolls, a relatively easy craft. Look for a how-to sometime near the New Year because for me, making, drying and then burning corn husk dolls is an end-of-the-year ritual.

This time around I decided to noodle around with corn husks and see what else could be done. If you've never worked with corn husks before, head for your nearest Mexican grocery store, buy a bundle of dried corn husks, and separate a bunch of them to soak in cold water in a large pot for a couple of hours. This makes them soft, pliable, and easy to work with. Once you've finished your creation let it dry and the husks once again become rigid and fixed in whatever shape you've created.

Corn husks: a very cheap craft supply

You can also dye the husks using a natural dye of your choice, from onion skins and beets to red cabbage, turmeric, or blueberries. This time around I experimented with pure cranberry juice, letting the husks soak overnight, and got the lovely rose shade you see here. Rinse the dyed husk thoroughly before using to get rid of the juice; the dyed color remains.

Corn husk necklace

My initial goal was to experiment with corn husk jewelry and I came up with this creation, comprised of cranberry-dyed corn husk disks and a couple of woven corn husk spheres, strung onto thin string. When wet, corn husks are easy to sew, which opens up lots of other future possibilities.

Corn husk necklace close-up

Because I couldn't stop there, I experimented with making a couple of miniature boxes, using a smaller version the recycled cereal box pattern I've posted previously, and an alternate pattern I found on the Web.

Corn husk boxes: natural and cranberry-dyed

Corn husk boxes

Finally, with a few remaining husks, I made a couple of corn husk flowers. These were assembled and then stitched together to secure the petals.

Corn husk flower

Corn husk flower

Expect more corn husk experiments in future months. I will be experimenting with more natural dyes, with stitching, and with corn husk flower brooches.


Related Posts with Thumbnails