Monday, December 31, 2012

Recycled Ribbon Awards

Assortment of award ribbons

The week between Christmas and New Year's seems like a good time to recycle ribbon from holiday gifts, whip up some awards, and distribute them to unwary recipients for a variety of reasons or no reason at all. Add some old smashed, rusted bottle caps and we've got a winner—a whole bunch of winners. These are pretty, lightweight, and will provoke a fair measure of social interaction when worn as a brooch. Since the materials are completely recycled, you can start by awarding one to yourself for being so virtuous. First some sample awards, then a how-to guide.


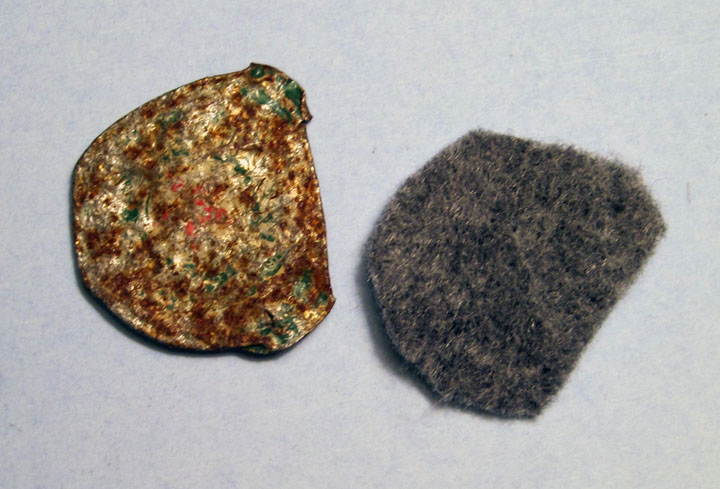
Close-up of gorgeous, rusted bottle cap


Close-up of bottle cap

And now for the how-to:

First, sort through your ribbons and find one piece of wide ribbon 12 inches long, and a piece of narrower ribbon 10 inches long. Form each piece of ribbon into a loop and seam the ends together as shown below. Then stitch along the inside edge of the loop, pull to gather, and secure with a knot.

Make gathered ribbon loops

Cut out a piece of felt the same size as your bottle cap.


Stitch felt to back of the wider, 12-inch gathered ribbon.


Gathered ribbon stitched to felt

Turn to right side. Place second, narrower, ten-inch gathered circle on top of the first and stitch as shown below (but wait to glue bottle cap on until the very final step).


On back of pin, sew pin clasp in place (you could always use a safety pin in a pinch), and sew down trailing ribbons. The trailing ribbons can be any length and width that pleases you.


As noted, the final step is to glue your bottle cap onto the front of the award. I've used silicone but a glue gun would work well. You could use something other than a bottle cap, such as a button or other found object.

Thursday, December 27, 2012

Fused Plastic Bunting Bombing


Fused plastic bunting

Nothing says, "Yay! It's party time!" quite like colorful bunting. The urge to spread the fun around led to the concept of bunting bombing which, like yarn bombing or seed bombing, is done with a certain amount of stealth and leaves a bit of beauty in its wake.

Bunting strung across window


The first step, however, is the fusing. Fusing plastic for art is different from the technique used to create sturdy, utilitarian objects like tote bags. To see how-to instructions for creating thinly layered, artfully composed fused plastic suitable for bunting, see Fused Plastic Chinese Lantern. When fusing plastic for bunting, you will want to be quite deliberate in placing colorful bits and pieces of plastic in an arrangement that will work well when the piece is cut up into bunting panels. Samples are offered below.

Sample of fused plastic bagging to be cut into bunting panels

Another sample

Once you've finished fusing, you'll want to cut the fused plastic into bunting panels. For the bunting shown in the photos above, two sizes were created based on a 2-inch by 3-inch pattern, or on a 3-inch by 5-inch pattern (the size of a standard index card). Decide on the size of your bunting and create a cardboard template for each of the three bunting shapes.

Cut patterns out of card stock (or start with standard index card as your rectangle)

Place your bunting templates, arranging them over the most colorful areas of the fused plastic. Trace around them with a pencil and cut out your bunting panels. Fold the bunting panels over at the top, pressing firmly to create a crease. Reopen the crease, smear with glue using a glue stick, and fold the panel over a piece of string, pressing at crease line to secure panel to the string. Alternate shapes. Leave plenty of empty string at either end to allow flexibility in hanging and securing your bunting.

Now you're ready to bunting bomb. Below is the copy from a bunting bombing brochure I distributed over Christmas to a gang of bombers, along with strings of fused plastic bunting.


Friday, December 21, 2012

Fused Plastic Chinese Lantern


The continuing exploration of the possibilities of fused plastic led to the merging of an antique Chinese lantern with some 21st century garbage bags. For background on how I originally reconstructed the antique lantern from rubble and photos of an earlier incarnation of the lantern, see Seeing Chinese Lantern.

For this project I realized that while clunkier fused plastic projects like shopping totes, wallets, or raingear may call for six to eight layers of plastic bagging fused together, you want far fewer layers when your focus is on translucent aesthetics. To make the plastic look absolutely beautiful when the light shines through, the question is how few layers you can get away with. The answer seems to be two.

Two to three layers of plastic fused to create panel

Two to three layers of plastic fused for lamp panel

To briefly recap once again how to go about fusing plastic: Place layers of plastic from cut-up plastic bags between two sheets of paper; experiment with correct iron setting to fuse plastic together (suggestions include rayon setting or just past wool setting); work in well-ventilated area. To create artsy, translucent panels, play with placement of various scraps of colored plastic and see what happens.

Work area (static electricity makes finished panels cling to window for temporary storage/display)

Sample panel

The fused plastic panels were then cut to size and glued into the Chinese lantern. While you may not have a Chinese lantern handy, consider placing fused plastic panels into empty picture frames and then propping those frames in windows. Or stay tuned for the next Stuff You Can't Have posting to see some gorgeous fused plastic bunting. Below are photos from the lantern project and the finished lantern.

Replacing lantern panels with fused plastic


Finished lantern


Monday, December 17, 2012

Boro Mending Converse All Stars


Recent work on fused plastic shoes started me thinking about shoes in general and how to mend/repair/alter them. Recent work on the Japanese tradition of boro mending and sashiko stitching seemed like a logical experiment. So here you have it: boro mending on my old brown linen Converse All Stars.

As with many favorite old shoes, once these got tattered they ended up in the dead shoe pile at the back of my closet.

Worn, torn, resurrected from the dead shoe pile.

For more how-to tips and background about the sashiko stitching and boro mending used for this repair job, see the original Uber-Boro post. Note that some of the green linen used to boro-mend my traveling vest has been used here, making for a head-turning fashion statement when I strut down the street decked out in vest and All Stars.


Go Boro some shoes of your own and I'll see you on the mean streets.

Monday, December 10, 2012

Fused Plastic Upcycled Shoes

Upcycled shoe using Lucky shopping bags

While I upcycle a lot of things, for some reason it had never occurred to me to upcycle a shoe, though lord knows I have a plethora of old shoes kicking around the floor of my closet. I find it very difficult to throw away a shoe that was comfortable and served me well. A case in point is this pair of black Rocket Dog shoes. I liked their clunky charm and wore them so much that they cracked and went to rest in the depths of the closet graveyard for a few years.

Original shoe, worn and cracked

Now they are being resurrected through the miracle of fused plastic. There are any number of tutorials on the web regarding how to fuse plastic grocery bags. In brief, cut the bags into rectangular sheets; stack six to eight sheets; fuse together using your iron after experimenting with settings to see which setting works best (on my iron that is just past the wool setting). Put a sheet of paper below and above your plastic stack to protect both your iron and your work surface. Work in a well-ventilated space.

Fusing plastic
In practice, experimentation indicates that while six to eight layers of plastic may be ideal if you are making fused plastic purses or Barbie doll clothes (see Eco Barbie - Experiments in Fused Plastic), just two or three layers are preferable for this shoe project, providing much-needed flexibility.

Decoupaging fused plastic onto a shoe

After trying and testing both silicone sealant and ModgePodge, neither of which worked for reasons I won't go into, I settled on using a good old glue stick to attach the plastic to the shoe. You need to cut pieces into various shapes and test them in a dry run by holding them against the shoe until you've got shapes that work with the curve of the shoe and don't fight back.


Finished shoe, sealed with ModgePodge

After all gluing is complete, the entire shoe can be sealed with one or more coats of ModgePodge. Frankly I don't know if that step really adds anything to the end result, but it seemed like a good idea. Note that this shoe has a ridge running down the front, which is left intact and serves as an accent. The shoe also has a band of elastic at the back. The black cover for the elastic had cracked and fallen away in places, so I touched up using a black permanent marker to cover the white elastic underneath.

Finished pair

Will these hold up to actual use? I've test-worn them around my apartment and so far, so good. I figure I can always travel with a glue stick and a few scraps of plastic in my pocket for on-the-spot repairs. If you live in the vicinity of Oakland, California, keep your eyes open and you may spot these shoes in action some night soon while I'm out dining at Hawker Fare or strolling around during Art Murmur.

Thursday, December 6, 2012

Seaglass + Recycled Bottles = Plastic Fantastic Curtains

Since it is time to redo my postage-stamp size kitchen, I realized I needed to scrap my old seaglass curtains (last seen here, in Rubble Decor).

Seaglass curtain

In the past, I've played around with both seaglass and using pockets in curtains (see Window Fantasies and Window Fantasy Close-ups).

Detail from bedroom window fantasy curtain: broken auto tail light and scraps of broken jewelry

All of these experiments failed in one critical sense. What I was envisioning was a sort of faux stained glass effect, created by light streaming through the seaglass to form a play of colored light on the walls. Didn't happen. When you look at the curtains, it is pleasing to see the glass illuminated from behind and the curtains themselves can be very colorful, but light doesn't go through the glass in a way that creates anything whatsoever on interior walls.

I tried to solve the problem when playing with new dining room curtains by using photo filters (see Photo Filter Window Treatment).

Photo filter window treatment

This worked in terms of creating shifting patches of colored interior light, and I do enjoy the dance of purple light on the hardwood floors in the morning, but I wasn't ready to abandon the pocket approach or seaglass entirely.

 I created new kitchen curtains using cheap Ikea white mesh curtains (about $10 a pair). After trimming them for length, I had plenty of yardage left over to use for creating pockets. This time I decided to go with all green seaglass and, as per the definition of insanity, after trying the same thing yet again I got the exact same result: zero play of light on the interior walls. What to do? A serendipitous bout of stomach flu and the purchase of a couple of bottles of ginger ale solved the problem. At one point in a bleary haze I noticed how the light was coming through the bottle, held the bottle up to the sunlight, and voila - a patch of green light on the wall. Instead of abandoning the seaglass, which still looks nice when viewing the curtains from the inside looking out, I simply added scraps of green plastic from the ginger ale bottles.

Wash bottle and remove label

Cut plastic into organic shapes (not strictly necessary but these shapes pair nicely with the seaglass)

Plastic has been added to pockets in lower half of curtain only at this point

Combining plastic and glass

And the end effect - very magical mornings in which I am mesmerized by the play of light on the walls while I wait for my coffee water to boil.

Light on wall


Related Posts with Thumbnails