Thursday, November 17, 2016

Time Machine Advent Calendar


Time Machine Calendar

This is the sixth year of creating advent calendars for two young recipients who are now ages seven and five (though the five-year-old missed out on the earliest ones). This year's theme is time travel, based on a discussion back in October with the girls about how you can look forward to a future self or back to a past self and communicate with yourself along the timeline. I asked each of the girls what their message would be to a future self. I combined their responses with photos of them and had them made into jigsaw puzzles. See those results below.

Message to future self

Jigsaw version

Message to future self

Jigsaw version

The next step was to come up with time machine advent calendars that would slowly reveal to the girls the messages from their past selves as they receive a few jigsaw puzzle pieces each day and slowly put them together over the month. And here is one of the completed time machines:

The time machine

Time machine construction begins with a green plastic ginger ale soda bottle, which cut horizontally about a third of the way from the top and then embellished to within an inch of its life with ribbon, little jewels, and a name scribed on with glitter pair.

Embellished bottle

Time components - old watch parts

I used up my stash of old watch faces and innards to underscore the time traveling nature of this creation. I divided the puzzle pieces up and put a few in each little gift box, numbering the boxes for the days of the month and hanging them from a ribbon that dangles down within the bottle. Each box also contains either a foil-wrapped chocolate coin (traditional) or a Hershey's kiss - because kisses are 109 years old and have themselves travelled a long way through time. The result of the hanging boxes is a jumble: you have to hunt for the right number each day. Note in earlier pictures above the embellished wood washers I used just inside and outside the neck of the bottle to prevent the top loop (used for hanging the creation) from slipping back through the bottle, or the little boxes from all being pulled up into the inside of the bottle.

Little boxes, numbered by day

And here is how the little boxes were made. Start collecting toilet paper rolls!

Materials

Glue either paper or ribbon around toilet paper rolls. I used a lot of old sheet music from World War II (including "The Road to Mandalay" and "The Victory Polka") to reinforce the time traveling nature of this all.

TP roll covered in sheet music
Fold ends of the toilet paper roll in. This creates a nifty little box and the folded closures stay put until you open them.

Fold in ends

Voila! Instant little box

Embellish the boxes however you wish. I scored a sizable stash of little stick-on jewels and the like from a local art recycling depot. To dangle the box from the bottle, use an embroidery needle and string a ribbon or gold cord through one of the corners of the box. Put numbers of the days on the boxes with glitter paint.

Embellished hanging box

Ribbon glued around TP roll, embellished with little pearls

For about a quarter of the boxes I used old pictures of the girls from the past, converted them to sepia tone in Photoshop, and combined them with timepiece-themed images. These were then glued around the TP rolls instead of the sheet music or ribbon.

Embellished with photo from the past

And that is it for this year's calendar, all ready to ship. See creations from past years, including advent calendar couture, at the following link: Advent

Thursday, November 3, 2016

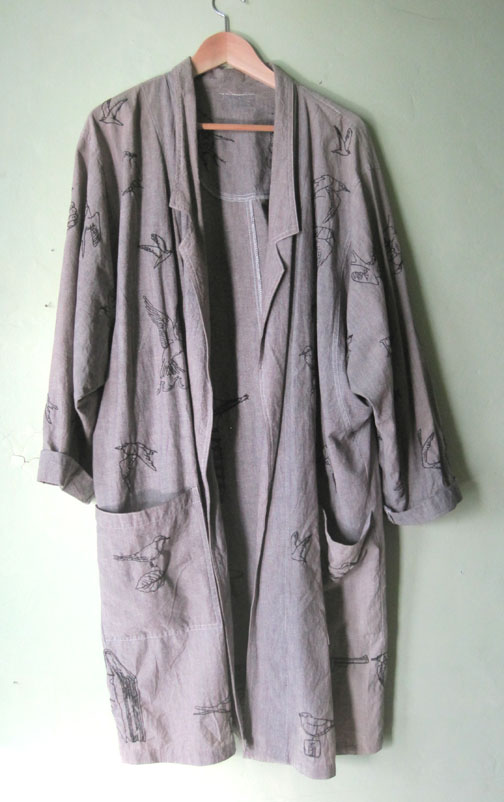
Pun Couture: The Tern Coat

Have you ever created a huge, time-consuming project based on a total misunderstanding? Welcome to the Tern Coat - a labor-intensive, wearable pun.

Tern over a new leaf

Decades ago a friend told me a story about two young men in their late teens who gamboled about the San Francisco Delta and exchanged love notes that always contained a little drawing depicting a pun based on the words "tern" and "turn." Just after completing this project we had dinner and he told me I had completely misremembered the story. No matter - the false memory led to weeks of absorbing labor that resulted in the following.

Coat front

Coat back

The coat, which used to be an ankle-length duster I've had since the '70s, now shortened to about mid-calf, is embellished with 25 embroidered tern/turn puns. And here they are. 

A tern for the worse

Tern the other cheek

Done to a tern

From here to eternity

One good tern deserves another

Taking your tern

The tide has terned

Tune in, tern on, drop out

Tern back time

Tern a deaf ear

Tern down

Tern it over

Tern of the century

Tern off
Tern of the screw

Tern on

Tern on a dime

Tern the page

Tern the tables

Tern turtle

Tern up

Tern up the heat

Tern up your toes

Tern up your nose

From a distance, the garment simply looks like a patterned coat. It isn't until you get up close that you begin to wonder what is going on.

Coat detail

Coat detail

Coat detail

Coat detail

All in all, I'm pleased with the way it terned out.


Thursday, September 1, 2016

How to Grow Fat Gracefully: The Double Shirt


The completed double shirt

The problem? Two shirts, each okay in their own way but each a bit too narrow to gracefully drape an expanding mid-section.

The solution? Double them up! (Note that one of the shirts had already been altered in the past with the addition of gorgeous vintage buttons.) Here are a couple of how-to diagrams that those with sewing savvy will hopefully be able to follow.

How-to A (click to enlarge)

Because I tend to get hot, one strategy was to remove the sleeves and back of the shirt underneath so that I wouldn't be suffering under a double layer of cloth. The only place the shirt ends up double is the front, and the top shirt always remains open, eliminating the problem there. Begin by slitting the shirt that will be underneath up the back. This is simply for fitting - this back will be completely removed in the final product. Put the two shirts on together, and move about until the combo is hanging in a comfortable, flattering fit. Pin the top shirt to the bottom shirt along the top shirt's side seams. Take the shirts off together, and pin along the top shirt's shoulder and back collar seams. Cut away the bottom shirt's sleeves and back.

How-to B (click to enlarge)
The end result is that you gain several inches at either side of the shirt, and the whole thing is airy and comfortable because you'e removed the back and sleeves of the bottom shirt. And with all of that extra material, you can create a new pocket and...add polka dots!

How-to C

Finished shirt front

Finished shirt back

Bonus Polka-Dots How-To

Lately I am loving polka-dots and have come up with an easy way to crank out perfect polka-dots every time. Start by creating a bunch of polka-dot templates on light cardboard (advertising postcards work perfectly). Use the rim of a glass, jar or cup that matches the size of the polka-dots you want, and trace around the rim with pen or pencil on the cardboard to create a series of circles. Cut them out. Cut the cloth you're going to use for your polka-dots into rough circles with about a half-inch extra all around.

Cardboard template and cloth

Ironing around the template

You'll find you can work in sections, folding part of the cloth circle over the template, ironing, and then folding and ironing the next section of the cloth circle. Takes a little practice, but you get more nimble very fast.

Fully ironed polka-dot

Just before stitching, slide the cardboard template out and save for later use. Pin down and stitch the polka-dot.

Stitched polka-dot
Related Posts with Thumbnails