Thursday, November 3, 2016

Pun Couture: The Tern Coat

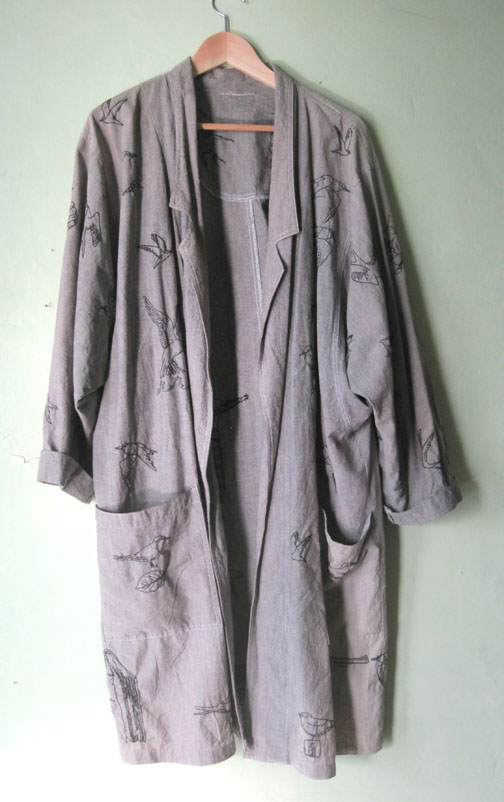
Have you ever created a huge, time-consuming project based on a total misunderstanding? Welcome to the Tern Coat - a labor-intensive, wearable pun.

Tern over a new leaf

Decades ago a friend told me a story about two young men in their late teens who gamboled about the San Francisco Delta and exchanged love notes that always contained a little drawing depicting a pun based on the words "tern" and "turn." Just after completing this project we had dinner and he told me I had completely misremembered the story. No matter - the false memory led to weeks of absorbing labor that resulted in the following.

Coat front

Coat back

The coat, which used to be an ankle-length duster I've had since the '70s, now shortened to about mid-calf, is embellished with 25 embroidered tern/turn puns. And here they are. 

A tern for the worse

Tern the other cheek

Done to a tern

From here to eternity

One good tern deserves another

Taking your tern

The tide has terned

Tune in, tern on, drop out

Tern back time

Tern a deaf ear

Tern down

Tern it over

Tern of the century

Tern off
Tern of the screw

Tern on

Tern on a dime

Tern the page

Tern the tables

Tern turtle

Tern up

Tern up the heat

Tern up your toes

Tern up your nose

From a distance, the garment simply looks like a patterned coat. It isn't until you get up close that you begin to wonder what is going on.

Coat detail

Coat detail

Coat detail

Coat detail

All in all, I'm pleased with the way it terned out.


Thursday, September 1, 2016

How to Grow Fat Gracefully: The Double Shirt


The completed double shirt

The problem? Two shirts, each okay in their own way but each a bit too narrow to gracefully drape an expanding mid-section.

The solution? Double them up! (Note that one of the shirts had already been altered in the past with the addition of gorgeous vintage buttons.) Here are a couple of how-to diagrams that those with sewing savvy will hopefully be able to follow.

How-to A (click to enlarge)

Because I tend to get hot, one strategy was to remove the sleeves and back of the shirt underneath so that I wouldn't be suffering under a double layer of cloth. The only place the shirt ends up double is the front, and the top shirt always remains open, eliminating the problem there. Begin by slitting the shirt that will be underneath up the back. This is simply for fitting - this back will be completely removed in the final product. Put the two shirts on together, and move about until the combo is hanging in a comfortable, flattering fit. Pin the top shirt to the bottom shirt along the top shirt's side seams. Take the shirts off together, and pin along the top shirt's shoulder and back collar seams. Cut away the bottom shirt's sleeves and back.

How-to B (click to enlarge)
The end result is that you gain several inches at either side of the shirt, and the whole thing is airy and comfortable because you'e removed the back and sleeves of the bottom shirt. And with all of that extra material, you can create a new pocket and...add polka dots!

How-to C

Finished shirt front

Finished shirt back

Bonus Polka-Dots How-To

Lately I am loving polka-dots and have come up with an easy way to crank out perfect polka-dots every time. Start by creating a bunch of polka-dot templates on light cardboard (advertising postcards work perfectly). Use the rim of a glass, jar or cup that matches the size of the polka-dots you want, and trace around the rim with pen or pencil on the cardboard to create a series of circles. Cut them out. Cut the cloth you're going to use for your polka-dots into rough circles with about a half-inch extra all around.

Cardboard template and cloth

Ironing around the template

You'll find you can work in sections, folding part of the cloth circle over the template, ironing, and then folding and ironing the next section of the cloth circle. Takes a little practice, but you get more nimble very fast.

Fully ironed polka-dot

Just before stitching, slide the cardboard template out and save for later use. Pin down and stitch the polka-dot.

Stitched polka-dot

Thursday, August 25, 2016

Monsters: A Stitching Saga


A gripping monster story unfolds

You sometimes need little more incentive than an utterly boring shirt to trigger a sewing project. It helps to have a five-year-old and seven-year-old on hand who are masters in art naif. I put in a request for monsters and they delivered, as shown in the test embroideries below.

Test monsters and victims

Big armless monster with horns

Fleeing victim with one arm and head on fire

Victim who looks ready to fight back

Small monster with lots of hair, no arms, and a beak

Before showing off the monster shirt, here is a quick how-to regarding altering and transferring a child's crayon scribbles into an embroidery template.

Here are the original drawings:

AJ's monsters and victims

Cici's monster and victims

The first step was to scan the pictures and then convert them from color to grayscale. I used Photoshop, but you can use any graphic software. I also played a bit with sizes of the figures, and arranged them on a sheet for printing out using InDesign. You could print directly from your graphic program or place them into a Word document or whatever.

Page full of monsters for printing

I then cut the monsters out individually, readying them for transfer. For the test monsters at the start of this post, I simply used a sheet of carbon paper to trace the black and white monster image onto the linen. For the monster shirt, which is dark gray, I used transfer paper specifically designed for use in transferring marks onto cloth. It rubs right away (in fact, you have to be careful not to smudge it away while hand stitching) and comes in a pack of five sheets of different colors. I used white to transfer onto gray.

Using chalky transfer paper to trace the image onto the cloth

The transferred image

Stitching the transferred image

And now for the final product: the monster shirt. The front of the shirt remains completely plain with no embroidery, offering no clues to the turmoil happening on the back.

Shirt front

On the back, a losing battle is in progress.

Shirt back
At the top, we see a monster in the center, surrounded by victims who are screaming, panicking and trying to flee.

Upper shirt back

Close-up
Victims are fleeing to the back of either sleeve, and a bunch of victims think they've found a way out, running diagonally down the shirt and trying to escape at the lower corner. What they don't realize is that the small, beaked, hairy monster lies in wait for them there.

Victims try to escape

Little monster lying in wait

And there you have it — the shirt is no longer boring.

Related Posts with Thumbnails