

Step One
Select a nice assortment of lemons, oranges and/or limes. Note that limes are the most difficult to work with (the pith is tough). Oranges and lemons are relatively easy.

Step Two
Cut fruit in half horizontally. Keep track of which are the two halves of each fruit so you don't end up mixing and matching halves. The two halves make one box.

Step Three
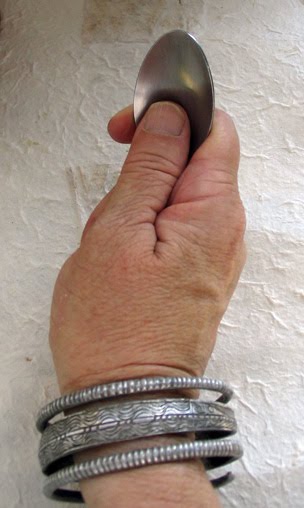
Hold a spoon in the position shown below, and use it to remove the innards and to gently scrape the pith away from the inside of the fruit. Don't scrape to the degree where the rind is very thin (i.e., don't scrape away all of the white pith entirely). Sometimes if you scrape too hard you'll pierce the skin. That's okay, live and learn. Just start over with another fruit.

Fruit innards removed, some white pith remaining.

Scraped-out lemon

Scraped-out orange
Step Four
You will now need an assortment of jars or glasses of different sizes, and a bunch of rubber bands. Note that you can use jars that still have things in them—this process won't affect jar contents. Put the "bottom" half of the fruit over one jar or glass (using bottom of glass). The "bottom" of the fruit is where the fruit was attached to the tree. Put the "top" half of the fruit over a slightly larger jar or glass. The "top" half of the fruit often has a nubbin. Press/pull firmly on the fruit so it fits neatly over the container (this is why you'll want a variety of containers on hand—to assure that you'll have ones that fit your fruit well). Secure with rubber bands.


Every day or so, move the rubber bands a little bit on the fruit so you don't end up with rubber band indents on your box. The drying process will take a week or two. It's "done" when the box is dry and hard. At this point, gently pry/remove the fruit half from the container used as a mold. Come to think of it, this step would probably be easier if you put some cellophane over the container to begin with. Otherwise, the fruit tends to stick a bit to the container and needs to be pried away, which is how I've always done it.

Orange on an upside down glass
Step Five
You may decorate your box in any number of ways (see illustration at the beginning of this post).
• You may line the interior of the box with paper, cutting the paper in small strips and using a glue stick. I've used Chinese good luck paper, fortunes, etc. Box below is in progress, being lined with tissue-thin Chinese paper. Once all gluing is done, trim around upper edge.

• You may glue a little bead or whatnot to the top of the box (see the tiny half Buddha on one of the sample boxes at the beginning of this post and the frog bead on another).

• You may use a large needle and thread and attach beads or a dangle, as seen in the third example above. Just pierce through the box top from below, put needle through your dangle or bead, and pierce back through the box top (so you've created just two needle holes). Tie the thread in a knot inside the box top. If you opt for this method, you may then want to use the decoupage/paper technique on the interior of the box top to hide the knot.
Have fun (and check out the "Over the Top Lemon Box" posting to see the project take another turn).
I love this idea. I am going to try it!
ReplyDeletelove the third picture with the cut-up fruit, so colorful!
ReplyDeleteI was obsessed with this and have made 4 - love them!
ReplyDeleteI've made 3 and painted little scenes on them. Love them, enjoyed doing it. Thanks for sharing.
ReplyDelete