Showing posts with label repurposed men's shirts. Show all posts

Friday, August 10, 2018

All the Rage: Political Fashion


Photo transfer onto cloth

There comes a time when it is incumbent on citizens of good conscience to wear their politics on their sleeve—literally. This is the first in a series of upcycled political fashion titled All the Rage.

Say them loud, say them clear: 

"Transgender, fetus, evidence-based, science-based, entitlement, vulnerable, diversity. 


These are the seven words highlighted in a memo and follow-up meeting at the Centers for Disease Control under the Trump regime, advising staff members not to use these words in any official documents prepared for the budget. Follow-up on this story indicates this wasn't so much a ban originating at higher levels of the CDC as a strategy to avoid trigger words that might reduce chances of getting funding from a right-wing, reactionary, Republican-controlled government. (Meanwhile, references to climate change have been removed from the Environmental Protection Agency website, but that's a censorship shirt for another day.)

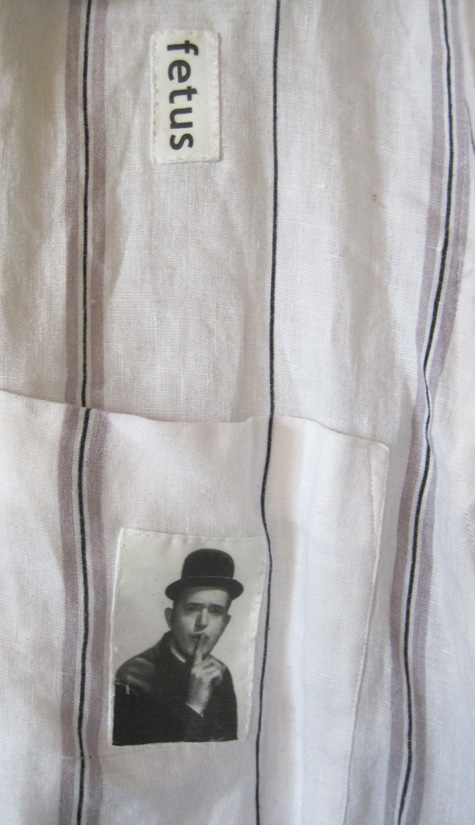
What better way to provoke conversation among the populace about these seven words than to don a forbidden words protest shirt? The words, along with vintage black and white photos of Laurel and Hardy making shushing gestures, were printed onto photo-transfer paper, ironed onto cloth, and stitched onto a linen thrift-store shirt.

Ironing photo transfers onto cloth

Shirt front

Close-up

Close-up

Close-up

Shirt back

Close-up

Close-up

Inspired? Go out and make some protest couture of your own.

Sunday, July 29, 2018

Urban Summer Vest for Discerning Gentlemen


Summer vest

What to wear during summer in the city, trying to keep track of glasses, bus passes, money, and other assorted crap one simply must have on hand while simultaneously fighting sweltering heat? The gentleman's summer vest, of course, a lightweight garment fashioned from recycled thrift store men's shirts.

Piecing detail

As always when piecing together thrifted fabric, some of the garment's most alluring details are the result of sheer necessity (i.e., patch this piece over that piece or you will have a gaping hole).

Vest back

Because the recipient of this garment is a man on the move, I've added a small graphic from an ancient Persian text onto the back, created using photo transfer paper.

Swimming against the tide

Monday, July 16, 2018

Indigo Girls: At Play with Shibori


Awash in indigo

Here are the results of a session of shibori dyeing with two young apprentices ages six and eight. Above you see the fruits of our labors, including two t-shirts, two stuffed animals (designed and stitched by the girls), and lots of dyed cloth using a variety of shibori wrapping techniques.

To learn more about traditional Japanese shibori dyeing, just google "shibori," or visit this site, which has one of the best overviews of various shibori techniques in a series of easy-to-follow photos: https://honestlywtf.com/diy/shibori-diy/. I highly recomend the Dharma Trading Company shibori dye kit as an easy intro to this technique. We could have dyed a lot more with their kit (https://www.dharmatrading.com/kits/starter/sets/indigo-dye-kit.html), but we simply ran out of cloth.

Dream bear

Dream cat


Note that the stuffed animals are actually "dream animal pillows." This sewing project for the girls was based on the folkloric wisdom that sleeping with your head on something that has been indigo dyed produces deep sleep and pleasant dreams. Other than help drafting the initial pattern and a little stitching assistance with the faces, the girls were on their own.

Once the girls had their animals completed, I packed up the remaining fabric and later pieced together two dresses, combining the indigo-dyed cloth and recycled fabric from thrift store men's shirts. Here is the dress for the eight-year-old:

Dress front

Dress back

Dress detail

Dress in action

And here is the dress for the six-year-old. She has not kept still long enough for a photo.

Dress front

Dress back with surprise pocket

Once you dabble in indigo it is easy to get hooked. 

It's hard to be unhappy in shibori

Friday, December 15, 2017

The Longfellow, Williams, Milne Memorial Nightshirt for Fractious Young Women


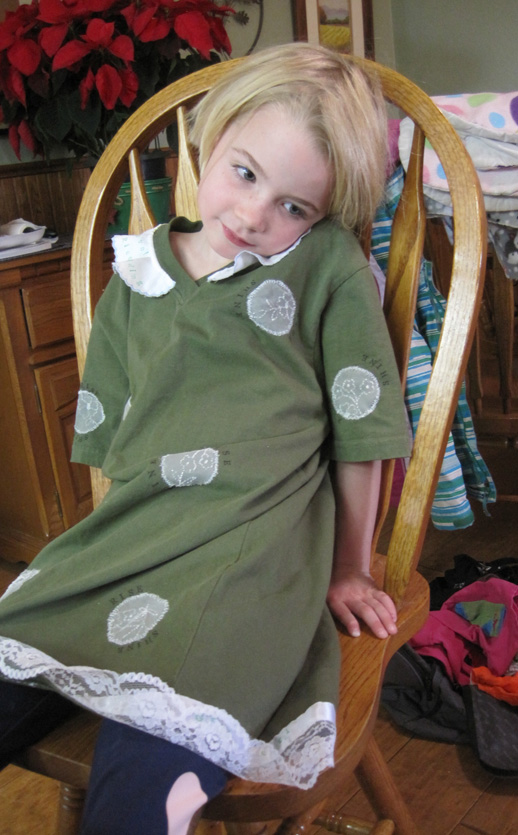
This post could just as easily be called "Big Fun Fooling Around with Upcycled T-shirts." It began with an extra-large man's T-shirt from the thrift store. The lace edging at the hem and the added collar came from the Oakland Museum White Elephant Sale (in that last 60 minutes when you get all you can stuff in a bag for a dollar). The lace polka dots were cut from Tennessee Williams' mother's curtains. Yes, they were really her curtains, and I've used them before in these projects: 1) Rise and Shine: Tennessee Williams' Mother's Curtains; 2) Rise and Shine II: Working with Scraps. These curtains are an endless source of material and entertainment. As I continue to fool around with T-shirts, you'll see them appear again in my next post. But for now, let's focus on the fractious young woman's ensemble:

Fractious Young Woman's Nightshirt

I also had fun during this project with a vintage alphabet printing kit. The focus was on quotes about fractious young women, including Longfellow:

Detail of key words from Longfellow's poem

The ribbon edging the lacy hem is printed with key words from Longfellow's classic, "There Was a Little Girl."

THERE was a little girl,
And she had a little curl
  Right in the middle of her forehead.
When she was good
She was very, very good,        5
  And when she was bad she was horrid.
- Henry Wadsworth Longfellow

Detail of key words from A.A. Milne
"The collar contains key words from one of my A.A. Milne favorites: "Rice Pudding."

What is the matter with Mary Jane?
She's crying with all her might and main,
And she won't eat her dinner - rice pudding again -
What is the matter with Mary Jane?

What is the matter with Mary Jane?
I've promised her dolls and a daisy-chain,
And a book about animals - all in vain -
What is the matter with Mary Jane?

What is the matter with Mary Jane?
She's perfectly well, and she hasn't a pain;
But, look at her, now she's beginning again! -
What is the matter with Mary Jane?

What is the matter with Mary Jane?
I've promised her sweets and a ride in the train,
And I've begged her to stop for a bit and explain -
What is the matter with Mary Jane?

What is the matter with Mary Jane?
She's perfectly well and she hasn't a pain,
And it's lovely rice pudding for dinner again!
What is the matter with Mary Jane
- AA Milne

From Tennessee Williams' quote

And finally, because my mother woke me up every morning of my childhood with the cry, "Rise and shine!" accompanied by a pull on the window shade which rattled up to flood my bedroom with an unwelcome glare, I used a Williams' quote from "The Glass Menagerie," using the key words to edge each polka dots fashioned from his mother's curtains.

“Every time you come in yelling that God damn "Rise and Shine!" "Rise and Shine!" I say to myself, "How lucky dead people are!” 
― Tennessee Williams, The Glass Menagerie

While the concept began as a nightshirt, when my little six-year-old recipient put it on it seemed like such a perfect dress for everyday use that she has been wearing ever since.


Tuesday, July 4, 2017

Upcycled Fourth: Red, White, and a Little Blue


Cannibalizing two shirts for the greater good

Two thrift store men's shirts, each sporting a red and white stripe pattern, are combined together to create one new upcycled shirt. And here's how:

The how-to

Some detail shots:

Detail, top of shirt

Detail, inset pocket (hand-stitched)

Detail: patches covering old shirt logos

Detail: Cuffs reattached at elbow height

And a bonus for the Fourth of July: Since the shirt sports red and white stripes, I decided to add a pin to round out the ensemble for the holiday. The pin is fashioned from an old tin can lid (for more how-to info on tin can pins see Tin Can Frames Tutorial, or enter "tin can pins" in the search window of this blog and see a whole range of past tin can pins).


And yes, the sentiment is both political and emotional.

Wednesday, June 21, 2017

Exotic Upcycling: Indigo Dreams


Shirt front

I have a friend who lives in London and travels around the world, and she periodically brings me some of her wonderful finds from thrift stores and local markets. This time around she brought me a gorgeous piece of West African indigo-dyed cloth comprised of many individual strips of cloth stitched together to form a checkerboard pattern. The challenge was that there wasn't enough of the indigo fabric on its own to make a garment. The solution? The addition of a man's pajama top from a local thrift store and a tricky process of blending the two together with a relaxed frame of mind so that quirks like ending up with a portion of a pocket on one sleeve caused delight rather than consternation.

Shirt Back

And here is how it all came together...

The how (click on image to enlarge)

More of the how - right sleeve

Left sleeve

And there you have it.


Wednesday, April 26, 2017

Sheer Desperation: Upcycled First Responder Shirt with Maximum Pocket Power


Perfectly Pocketed

Sometimes you entirely lose sight of reality while thrift shopping. This voluminous pale-green shirt caught my eye and I had to have it, despite the fact that it violated my cardinal clothing rule: pockets are absolutely mandatory. This shirt had none. In addition, the garment is so sheer as to render it useless for all practical purposes, particularly when worn by a 68-year-old woman.

Totally sheer

What to do? I decided to make this shirt work against its intrinsically frivolous nature by transforming it into a street-ready uniform as part of my ongoing First Responder series. An ancient Chinese first aid print, converted into an iron-on transfer image and then to a fabric patch, offers a handy first-aid manual for just about anything that could possibly break on the human body.


 I also used one of my go-to strategies for solving the pocket problem by adding cargo pockets. See Braving the Urban Frontier with Cargo Pockets for more creative uses for this common thrift store find.

Three simple tweaks.

Close-up

The plan is to wear this upcycled shirt as a tunic over a black t-shirt and leggings. I figure I can pack enough supplies into the pockets to keep me going in the face of just about any urban disaster for a couple of days.

Onward (and always armed with a dark sense of humor)!

Thursday, September 1, 2016

How to Grow Fat Gracefully: The Double Shirt


The completed double shirt

The problem? Two shirts, each okay in their own way but each a bit too narrow to gracefully drape an expanding mid-section.

The solution? Double them up! (Note that one of the shirts had already been altered in the past with the addition of gorgeous vintage buttons.) Here are a couple of how-to diagrams that those with sewing savvy will hopefully be able to follow.

How-to A (click to enlarge)

Because I tend to get hot, one strategy was to remove the sleeves and back of the shirt underneath so that I wouldn't be suffering under a double layer of cloth. The only place the shirt ends up double is the front, and the top shirt always remains open, eliminating the problem there. Begin by slitting the shirt that will be underneath up the back. This is simply for fitting - this back will be completely removed in the final product. Put the two shirts on together, and move about until the combo is hanging in a comfortable, flattering fit. Pin the top shirt to the bottom shirt along the top shirt's side seams. Take the shirts off together, and pin along the top shirt's shoulder and back collar seams. Cut away the bottom shirt's sleeves and back.

How-to B (click to enlarge)
The end result is that you gain several inches at either side of the shirt, and the whole thing is airy and comfortable because you'e removed the back and sleeves of the bottom shirt. And with all of that extra material, you can create a new pocket and...add polka dots!

How-to C

Finished shirt front

Finished shirt back

Bonus Polka-Dots How-To

Lately I am loving polka-dots and have come up with an easy way to crank out perfect polka-dots every time. Start by creating a bunch of polka-dot templates on light cardboard (advertising postcards work perfectly). Use the rim of a glass, jar or cup that matches the size of the polka-dots you want, and trace around the rim with pen or pencil on the cardboard to create a series of circles. Cut them out. Cut the cloth you're going to use for your polka-dots into rough circles with about a half-inch extra all around.

Cardboard template and cloth

Ironing around the template

You'll find you can work in sections, folding part of the cloth circle over the template, ironing, and then folding and ironing the next section of the cloth circle. Takes a little practice, but you get more nimble very fast.

Fully ironed polka-dot

Just before stitching, slide the cardboard template out and save for later use. Pin down and stitch the polka-dot.

Stitched polka-dot
Related Posts with Thumbnails