Tuesday, December 19, 2017

Shisha Stitching: The Trickle-Down Tie


The Trickle-Down Tie

Label on back of tie

Having trouble understanding the 2017 Republican tax bill? No worries — the latest item in our false product line helps explain how it works perfectly (while also serving as the ideal accessory for the heartlessly capitalistic). Coins in various denominations have been artfully attached to a thrift store tie using the ancient Indian art of shisha stitching, commonly seen on traditional mirror-cloth. We start with a quarter for those at the very top and then descend down through dimes, a nickel, a penny, and finally, for the truly poor, absolutely nothing.

How it works
If you want to stitch your own trickle-down tie, google "shisha embroidery" and start practicing. You'll be seeing more of my shisha work soon. Meanwhile, some detail photos of this piece:


Friday, December 15, 2017

The Longfellow, Williams, Milne Memorial Nightshirt for Fractious Young Women


This post could just as easily be called "Big Fun Fooling Around with Upcycled T-shirts." It began with an extra-large man's T-shirt from the thrift store. The lace edging at the hem and the added collar came from the Oakland Museum White Elephant Sale (in that last 60 minutes when you get all you can stuff in a bag for a dollar). The lace polka dots were cut from Tennessee Williams' mother's curtains. Yes, they were really her curtains, and I've used them before in these projects: 1) Rise and Shine: Tennessee Williams' Mother's Curtains; 2) Rise and Shine II: Working with Scraps. These curtains are an endless source of material and entertainment. As I continue to fool around with T-shirts, you'll see them appear again in my next post. But for now, let's focus on the fractious young woman's ensemble:

Fractious Young Woman's Nightshirt

I also had fun during this project with a vintage alphabet printing kit. The focus was on quotes about fractious young women, including Longfellow:

Detail of key words from Longfellow's poem

The ribbon edging the lacy hem is printed with key words from Longfellow's classic, "There Was a Little Girl."

THERE was a little girl,
And she had a little curl
  Right in the middle of her forehead.
When she was good
She was very, very good,        5
  And when she was bad she was horrid.
- Henry Wadsworth Longfellow

Detail of key words from A.A. Milne
"The collar contains key words from one of my A.A. Milne favorites: "Rice Pudding."

What is the matter with Mary Jane?
She's crying with all her might and main,
And she won't eat her dinner - rice pudding again -
What is the matter with Mary Jane?

What is the matter with Mary Jane?
I've promised her dolls and a daisy-chain,
And a book about animals - all in vain -
What is the matter with Mary Jane?

What is the matter with Mary Jane?
She's perfectly well, and she hasn't a pain;
But, look at her, now she's beginning again! -
What is the matter with Mary Jane?

What is the matter with Mary Jane?
I've promised her sweets and a ride in the train,
And I've begged her to stop for a bit and explain -
What is the matter with Mary Jane?

What is the matter with Mary Jane?
She's perfectly well and she hasn't a pain,
And it's lovely rice pudding for dinner again!
What is the matter with Mary Jane
- AA Milne

From Tennessee Williams' quote

And finally, because my mother woke me up every morning of my childhood with the cry, "Rise and shine!" accompanied by a pull on the window shade which rattled up to flood my bedroom with an unwelcome glare, I used a Williams' quote from "The Glass Menagerie," using the key words to edge each polka dots fashioned from his mother's curtains.

“Every time you come in yelling that God damn "Rise and Shine!" "Rise and Shine!" I say to myself, "How lucky dead people are!” 
― Tennessee WilliamsThe Glass Menagerie

While the concept began as a nightshirt, when my little six-year-old recipient put it on it seemed like such a perfect dress for everyday use that she has been wearing ever since.


Tuesday, November 28, 2017

Tangerine Bird Silhouettes


Swallow silhouette

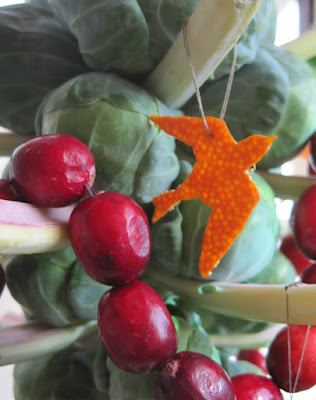
The previous post, Brussels Sprouts Holiday Branch, featured a variety of bird silhouettes carved from tangerine peels for decoration. Here are the how-to instructions for making your own bird silhouette decorations, to be used on a Christmas tree or just hung in a window to brighten your day with their orange glow as the sun shines through. 

I cut my tangerines in half vertically because I end up with more useable peel surface that way. Once your tangerine is cut in half, use a spoon to remove the fruit inside and to scrape all (or at least most) of the white pith from the inside of the peel. Be gentle but firm. This is a learn-as-you-go technique, figuring out how to be gentle enough not to tear the peel, but firm enough so that you remove the pith.

Scraping the pith from inside the peel

Either copy and print the image below, or download a printable PDF of this bird template sheet using this link: Tangerine Silhouettes.

Bird silhouettes: 8.5 x 11 sheet

The smaller silhouettes are suitable for use with tangerines; the larger silhouettes work well for use with oranges. Cut out birds, leaving a little space around each bird (you're not fine-cutting the silhouette yet). Glue each bird silhouette to a piece of tangerine peel using an ordinary old glue stick. This part of the process is a bit of a puzzle, shifting pieces around until you find a perfect fit between your silhouette and your section of tangerine peel.

Glueing silhouettes to sections of peel.

Use an X-acto knife with a clean, sharp blade to carefully cut out each silhouette.

Cut out silhouette using an exacto knife

Once you have finished cutting out your tangerine silhouette, simply wash off the paper and glue and pat the tangerine silhouette dry with a paper towel. At this point, use wire or thread and pierce a little hole in the top of your silhouette for hanging. You want to do this while the tangerine skin is still soft. Once dried, it will be brittle, hard, and difficult to do.

You have a couple of options for drying your tangerine bird silhouettes. I have found sand (available from any garden shop) works well, particularly when making tangerine boxes (another fun project you can find by following this link: Orange, Lemon and Lime Boxes). See example of bird silhouettes drying in sand below, but be aware that you want to completely cover the silhouettes with sand once you've placed them on the sand bed. 

Drying silhouettes using a bed of sand

Alternatively, you can press your silhouettes between several layers of paper towels, using a stack of books on top. Change the paper towels every few hours if using this technique. You want the end result to be totally dry and flat. Either the sand or press technique will take a couple of days. If you've dried them correctly, your decorations should last for several years.

Hanging owl silhouette

For an alternative, easier version of tangerine/orange decorations, try making star hangings: Idle Moments, Tangerine Stars.

Have fun, and enjoy the olfactory bonus as your home is suffused with the wonderful aroma of tangerines.

Wednesday, November 22, 2017

Brussels Sprouts Holiday Branch: Let the Revels Begin!


"Oh brussels branch, oh brussels branch..."

Here is a project that has been on my to-do list for years, ever since Trader Joe's began carrying veggie-laden Brussels sprouts branches as a holiday special just before Thanksgiving every year. The Brussels branch is a prime candidate for a new holiday tradition and of course, in the spirit of Thanksgiving, every element of the holiday Brussels branch is edible.

...how lovely are thy branches...

For those of you from around the world who don't celebrate this gluttonous holiday feast, feel free to incorporate the Brussels branch into your holiday festivities however you wish — as an alternative, edible Christmas tree, as a symbol of hope for the new year, as a pagan post for your Druid dances in the forest.

Tips and how-to advice:

• The upper, horizontal stalks provide supports for hanging decorations. The lower part of the branch remains solid sprouts.

• This holiday branch incorporates strung, fresh cranberries and bird silhouettes fashioned from tangerine peels. In less than a week I will be adding a how-to post to this blog about making your own orange and tangerine-peel silhouette decorations. You may, of course, decorate your own Brussels branch however you wish.

• The pot shown here has no holes on the bottom. It contains a little water to keep the branch fresh. More importantly, it contains a few big, heavy rocks to anchor the branch and offer it a little positioning support.

And now, enjoy some close-ups of my lovely Brussels branch and feel free to hum along to the classical holiday tune, "O Tannenbaum," substituting the phrase "Brussels branch" for "tannenbaum."


For truly dedicated revelers who are curious about how to go about actually eating their holiday branch once the festivities are over, here is a recipe for Cranberry Clementine Brussels Sprouts with Brown Sugar Glaze. Bon appétit - and stay tuned for the next posting on making orange and tangerine silhouette decorations. 

Wednesday, November 15, 2017

Advent Calendar Ball Gown 2017

Let the revels begin:

Advent ball gown for eight-year-old

Close-up

It is the time of year when I begin creating advent calendars, and this year's version is an interactive ball gown. Where is the ball? With the right attitude, the right gown, and the right accessories, the ball is wherever and whenever you say it is. The version above is for an eight-year-old recipient. The one below is for a six-year-old recipient. As this narrative progresses you will see the gowns unfurl.

Advent ball gown for six-year-old

Close-up

These gowns began with a search at the thrift store for promising "base" dresses - the wackier the better. Starting with size small dresses and armed with the recipients' measurements, I then took the dresses in to fit at waist, chest, and shoulders/armholes.  Note that the green dress above has a stretch torso, making fitting easier, but it was still taken in about two inches on each side.

The next step was to cut 25 sections of tulle, with each section comprised of two to three pieces of tulle. The tulle was attached at the waist of each dress. A little square of rough-cut cloth covers the top of each section of tulle, as shown below. This is brash, bold, we-don't-care-if-it-clashes sewing.

Anchoring down the top of each tulle section

A few ribbon embellishments adorned with bells or jewels were added to some of the tulle sections to add to the frivolity.

Each tulle section was then used individually to package a daily prize, including a chocolate coin (a yearly advent tradition) and a bead, in accord with this year's accessory theme. A few pieces of bling (rhinestone brooch, stick-on jewels) are included as occasional added treats. Tulle is wrapped around the objects at the bottom to enclose the contents, then rolled upward and tied off with a bow. Another little section of ribbon containing the date of the month is attached to each bow.

Loot bags, string, bling, beads and chocolate coins
The recipients each receive a loot bag along with their calendar at the beginning of the month. The loot bag includes instructions and two types of string for making jewelry. As they unwrap their beads each day, they stash them in their loot bags until they have enough to start stringing and making their own jewelry.

And here is what the gowns will look like on December 25, once all the little packages are open and all of the tulle is unfurled:

Gown for eight-year-old

Close-up

Close-up

Gown for six-year-old

Close-up

Close-up

One can only imagine the final splendor when the gowns are adorned with hand-crafted bracelets and necklaces. As a young man in San Francisco once told me: "Accessories are everything."

Sunday, October 15, 2017

Mending Mania: London


Sewing and patching kit: London 10/17

My small, portable hand-sewing kit is one thing I will never, ever travel without. In recent years I have started including a packet of patches as well. In addition to bits of varied material, I also have an assortment of one-of-a-kind patches I created using photo transfer paper and a bank of intriguing non-copyright images I have collected over the years. Fully armed and ready to stitch, I hit a very hospitable friend's house in London for a ten-day stay. She fed me wonderful food and showed me around the lesser-known neighborhoods of London, and I patched clothes for her and her family. Her glass-ceilinged dining room became my temporary sewing atelier.

Sewing atelier


The mending mania included one pair of ripped jeans for a son willing to embrace non-conventional repairs:

Mended jeans

Close-up of mend: patched photo transfer image combined with under-mend and sashiko stitching.

One reversible raincoat with holes in lower front (with additional patches added to balance the look):

Back of coat with vertical patch

Close-up of sashiko stitching used on coat patches

Two diaphanous cotton shawls for a pregnant daughter, incorporating ancient Chinese medical text image and ancient Arab monkey image.

Two shawls with decorative (as opposed to functional) patches

Close-up: shawl patch

Close-up: shawl patch

Four shirts worn and torn by my lovely hostess. I had already repaired earlier tears in some of these, so the end effect here in some cases is the result of cumulative patching.

2 mended shirts

Close-up: patch using ancient Chinese medical text image and photo transfer

Patch using image from old Arab book and photo transfer

Patch using traditional Japanese sashiko stitching

Cumulative patching

Sashiko stitching for traditional Japanese Boro patching technique

Sashiko stitching

Patch using cloth photo transfer

Shirt with small previous sashiko patch

New patch using scrap of old Guatemalan cloth

I am happy when I sew, and at this point in my life I cannot imagine traveling anywhere without a sewing kit and a supply of patches in hand. I believe the people wandering around the planet sporting one of my patches are happy also. 

Use it up, wear it out, make it do or do without.

Related Posts with Thumbnails