Wednesday, May 31, 2017

The Museum of Lost Childhood Beliefs


Here is a make-it-yourself museum complete with four galleries, featuring a theme that teeters on the brink between nostalgia and despair. What begins as a little book slowly unfolds...

Opening the museum


... and the result is a little museum that fits in the palm of your hand.

The fully-open museum

Each gallery in the museum celebrates a particular realm of cherished childhood beliefs — or serves as a bitter testimony to parental lies and betrayal, depending on how you look at it. A peek into the four galleries is offered below.

Wishing Gallery panels

Inside the Wishing Gallery

Fairy Gallery panels

Inside the Fairy Gallery

Boogeyman Gallery panels

Inside the Boogeyman Gallery

Gallery of Benevolent Beings panels

Inside the Benevolent Beings gallery

And for the ultimate interactive museum experience, you get to build a little Museum of Lost Childhood Beliefs yourself! Carry it around in your pocket and whip it out to amaze adults and utterly confuse anyone under ten years of age. Guaranteed to stimulate a lot of questions.

Templates for both a two-inch version (adorable because it fits in the palm of your hand) and a three-inch version (with larger images that make it easier to explore all the subtleties of the museum) can be found at the following link: https://groups.google.com/forum/#!topic/stuffyoucanthave-downloads/0-aLO8pJnCw.

2-inch and 3-inch versions


Wednesday, May 17, 2017

Lost and Found: The Ghost of a Shoe


Once an object is lost or abandoned and out on its own in the universe, it simply waits to be found. Some objects are luckier than others. Some have souls (see Tsukumogami: Objects with Souls). 

This object was a fortunate case of mistaken identity. While my dinner companion was driving us through the Piedmont parking lot one night, I spotted an object on the ground in an empty parking space and ordered a halt. We both peered at the object illuminated in the headlights and tried to figure out what it was. I finally got out of the car, picked it up, and it was mine — to do with as I wished before sending it back out on its travels in the world.

Original mystery object

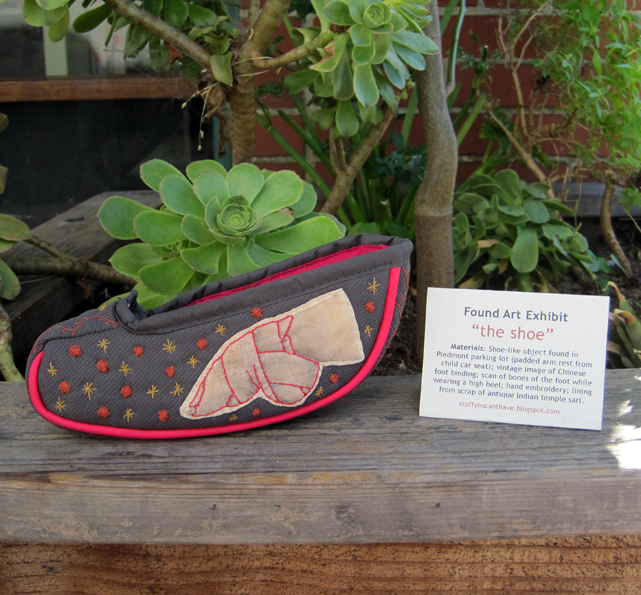
Both my dinner companion and I thought the object looked a lot like a shoe — more specifically, a Chinese shoe from yesteryear. By the time I ran into a six-year-old who immediately identified the object as the padded armrest from a child's car booster seat, it was far too late. It was already half-way to being transformed into the soul of a shoe.

Embroidered Chinese bound foot

Embroidered scan showing the bones of a foot inside of a high heel

Close-up

Lining: silk from 100+-year-old Indian temple sari

Detail

Embroidered sole

Detail

After giving this lost object a soul, the next step was to send it back out into the world to continue its journey. The ideal place to do that, of course, was to take it back to exactly where I had found it. Initially I thought the perfect spot to install the soulful shoe would be atop one of the payment machines in the Piedmont parking lot until this duo came along to use the machine....and I realized that basing the installation on my height might mean that a sizable portion of passers-by would never see it.

Installed atop parking machine

Test subjects

I re-installed the shoe and label card, moving it to a little planter rim on the edge of the parking lot.

Installed on planter rim

Close-up

Label

And then I walked away. The shoe is now out in the world. May its wanders be wondrous.


Friday, May 12, 2017

Inside-Out Boxes


3 gingko-printed inside-out boxes

It only takes one "hmmm...." moment to start an obsessive, hands-on maker fest. My most recent bout began with a cup of Yogi Ginger Tea from Trader Joe's. While waiting for the water to boil I looked down at the open box of tea and realized the folks at Yogi had gone to considerable effort to decorate the inside of their box. Curious, I settled in with my cup of ginger tea and took their box apart. From that point, turning the entire box inside out and re-glueing it seemed like an obvious idea.

Yogi tea box unfolded

It was the fate of this particular box to become a tiny puppet theater, produced by one of my grandnieces, but I began to wonder about the many other boxes that cycle through my life, ones with blank interiors. 

Inside-out box theater

I began to take apart boxes that would otherwise have ended up in the garbage, turn them inside-out, re-glue, and decorate the new exterior. The result? A lovely array of gift boxes for future use. Below are boxes sporting experiments with gingko leaf printing.

Before: Nicotine lozenge box

After: gingko-leaf printed inside-out box

Before: cookie box

After: gingko print box with peekaboo tissue reveal

The How-To:

Turning boxes inside-out is really easy. The only trick is to start by finding the hidden side seam. Peek inside an empty box and you will spot an overlapping seam at one of the corners.

Find the hidden seam

Next, gently pry that seam apart, using your fingers. There will probably be a little paper tearing as you pry one glued section from another but don't worry, marred sections will be hidden when you glue the box back together.

Pry seam apart

You will now have an intriguing flat box. First, turn every fold on the box firmly in the opposite direction from its original fold. Re-flatten the box. At this stage you can decorate the blank side of your box any way you wish. This could be a great project for kids using markers or crayons or paint for highly personalized gift boxes for holidays and special occasions. Just the process of seeing how the geometry of box shapes work is fascinating — at least it is to me.

Unfolded box

For my first box decorating project I used gingko leaf printing, which simply involves painting a gingko leaf with acrylic paint (copper in this case) and pressing it onto a surface. I usually get two prints out of one painted leaf round, and find that the second, fainter print reveals more leaf detail. You can use each leaf over and over, but try varying sizes for visual interest.

Gingko leaf printing

I also splattered the gingko boxes with a little gold paint, using an old tooth brush.

Gingko-printed boxes with splattered gold

The final step is to re-glue the boxes inside-out, beginning with that hidden side seam. You have already reversed all of the folds in the box, so the re-glueing process should be easy. When glueing the side seam, overlap the seam so that any marred, torn areas from taking the seam apart are hidden. Press firmly and let dry for a few minutes before glueing the bottom flaps closed. I found that a glue stick worked just fine.

Below is a final (for now) pass at inside-out boxes, using a house fly theme. No particular reason — I just thought it would be visually interesting. Materials here included a felt tip pen, acrylic paint, and some squeeze bottles of puffy 3-D paint. For one of the boxes (see below) I also used a vintage children's printing kit I have to print a quote from Bernie Sanders: "Despair is not an option."

Inside-out house fly boxes

Inside-out fly box with printing and peekaboo tissue

Side of box

The end result of this particular discovery/experiment is that I now have enough unique gift boxes to last a good long while. A more dubious side-effect is that I now have a very difficult time letting any empty box go into the garbage. Here is hoping you enjoy making some inside-out boxes of your own, resulting in a lot more gift giving and a lot less landfill.

Tuesday, May 2, 2017

Seasonal Boro Year 4


Kimono patched with four seasons of leaves

The gingko trees are in full leaf again, and here is year four of an ongoing process piece called "Seasonal Boro." It harkens back to the Japanese tradition of patching worn clothing, called "boro," using fine lines of "sashiko" stitching.

Close-up: leaf patch from a past season

The process gets more involved with this piece each season, as old leaves from previous years grow increasingly brittle. As with patching, the older and more worn they are, the more beautiful they become.

Kimono back with old and new patching

This scaled-down kimono is hand-stitched from Japanese fabric.

Worn gingko leaf patch

The second garment in this piece is a scaled-down traditional happi coat, now sporting a blend of old and new leaf patches.

Happi coat front

Close-up

Happi coat back

Close-up

Old gingko leaf patch

If you would like to look at all four seasons of this project and how the garments have progressed as the leaves have been added and then aged over time,  use this link: Seasonal Boro. If you would like to see how boro patching works in a beautifully practical way with fabric, simply use the link: Boro.

Related Posts with Thumbnails