Pages

Tuesday, May 27, 2014

Crystallization Experiments #3: Photos


Vintage photo with alum crystals

The final experiment for now with crystallization before moving back to textiles (which, by the way, do NOT crystallize well). To see earlier experiments see Crystallization Experiments 1: Books and Paper Ephemera, and Crystallization Experiments 2: Reading Glass Curtains.

Photo in supersaturated Borax solution

I half expected photos to simply dissolve or to have the images become muddied when immersing them in supersaturated solutions but not so. In fact the reverse is true; crystallization seems to seal and preserve the photos, particularly the Borax crystals.

The formula again involves 3 tablespoons of 20 Mule Team Borax per cup of boiling water, stirring to dissolve and create a supersaturated solution. Immerse the photo and wait for crystals to attach. The photo here (taken circa 1973 and printed by a drugstore photo service) was immersed for about a day. It is now rigid and covered in crystals.

Self portrait: photograph encrusted with Borax crystals

Close-up

The next photo, taken of my mother standing in the garden in Stone Mountain, Georgia circa 1949 or so, is also a commercially printed snapshot. This photo was immersed in an alum crystal solution (1/2 cup boiling water and 2.5 tablespoons alum), which forms much larger crystals, for about 24 hours.

Frozen hope: photo encrusted with alum crystals

Close-up

The final experiment involves a photo circa 1910 or so, developed on an uncoated paper much thinner than the photographic paper used today. I left it in a supersaturated alum solution for a few hours. It crystallized nicely but once out of the bath and drying, the crystals began to fall off. As a result the end result shown below is a bit of a cheat. I glued crystals back on, which enabled me to strategically place them where I wanted to. However, in the close-up below you can see that hundreds of miniscule little crystals are adhering to the photo paper on their own.

A Moment in 1910: photo with alum crystals

Close-up

How do you frame a crystallized photo? Find an old frame, remove the glass, and glue the photo directly to the frame backing. Here, both frame and backing were wood, which worked out well aesthetically.

Framed crystallized photo

 After viewing these experiments, a friend is planning to dip one-page programs for a memorial service for her mother in a Borax crystal solution. The possibilities are endless. The "frozen memories" metaphor is fairly compelling. Have fun experimenting on your own.

Wednesday, May 21, 2014

Crystallization Experiments 2: Reading Glass Curtain


Crystallized reading glasses

Kitchen curtain featuring crystallized reading glasses

The second in a series of crystallization experiments. For the formula on a dead-easy way to make crystals using 20 Mule Team Borax see Crystallization Experiment 1. Once you realize crystals can grow on objects, you start scavenging around your studio for interesting stuff to plop into the supersaturated crystal solution. This time around: reading glasses.

I know I'm not the only person who has the stem break off their reading glasses. In the past I've created another version of reading glass curtains by gluing old photo negatives over the lenses (see Eyeglass Curtains). They look fabulous but it turns out the negatives fade over time in the sun.

Reading glasses in Borax solution (note highly technical manipulation with chopstick)

After about 24 hours in a super saturated Borax solution I achieved the following results.

Crystal encrusted glasses

Close-up

Crystal-encrusted glasses

Attached to curtain with small wire at nose bridge

Close-up

And yes, this was an add-on to these curtains, which had already been embellished with pockets containing seaglass and shards of plastic ginger ale bottles (see Seaglass + Recycled Bottles = Plastic Fantastic Curtains).


Sunday, May 18, 2014

Crystallization Experiments 1: Books and Paper Ephemera


Crystallized German-English Dictionary

Interest in crystallization was piqued by a maker studio tour in San Francisco, during which I saw artist Alexis Arnold's crystallized books made using 20 Mule Team Borax. They were enchanting and I wanted to know how it was done, but she was charging $400 for a how-to workshop. Upon googling after arriving home I found that the 20 Mule Team Borax website offers the dead-simple instructions for growing crystals absolutely free, and a box of Borax from the local supermarket costs less than $6.

The formula:
- Use a glass or porcelain container large enough to immerse whatever object you want to crystallize.
- Boil water, and make a super saturated solution in your container using 1 cup boiled water per 3 tablespoons Borax.
- Immerse object (and in the case of the book, arrange pages using chopsticks) and wait for crystals to grow.
- When you think it's crystallized enough, remove from solution and dry on drying rack. The book shown took less than 24 hours.

Crystallized book on drying rack

The end result is a fixed object - crystallized and surprisingly heavy.

Crystallized book

Close-up

After crystallizing a book I began to wonder what other objects I could crystallize. Succumbing to my fondness for creating little shoes out of an infinite range of materials (see All My Little Shoes), I tried crystallizing a hand-stitched paper shoe.

Crystallized paper shoe

Side view

Then it occurred to me to experiment with collage. Turns out you can create a collage using a glue stick, immerse it in a super saturated Borax solution minutes later, and the crystals seal in the collage. The assemblage/collage below includes a booklet on the alchemy of quinte essence I got in India about forty years ago, a visa snapshot of me from the same era, and tucked into the booklet a scrap of Bharatanatyam dance notation I was studying at the time.  Now they're all a frozen memory.

Crystallized assemblage

Close-up of visa photo

The explorations did not end there. Stay tuned for more experiments in which I start crystallizing everything in sight.

Wednesday, May 14, 2014

Cannibal Couture: There Was an Old Lady Who Swallowed a Fly


Old lady with flies

This cannibal couture combines a thrift store man's shirt with a hand-stitched sleeveless top, seldom worn because the hem hit right at mid-belly, an unflattering length. Technically this is number 24 in the Repurposed Men's Shirts series. The basic construction is shown below:


I've recently become enamoured with insect images and the focus here is on flies. Iron-on images are used on scraps from the white shirt and then stitched onto the black camisole top. For the bottom half of the new outfit, flies are hand-embroidered in black thread.

Embroidered fly

Iron-on patch

The final outfit has 12 patches and 11 embroidered flies, totalling 23 flies.

Front - note breast pocket with 2 flies and the 2 lower pockets wrapping around the sides

Rear

Close-up of side pocket

Completed garment

Old lady with flies, front view

Old lady with flies, rear view

And a PS: As with all of my garments, this one incorporates vintage buttons.


Sunday, May 4, 2014

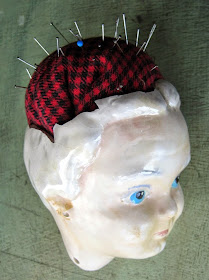
DIY China Head Pincushion


This is one of two new assemblage pincushions. The other one (click here for DIY Baby Head Pincushion) was more successful in a utilitarian sense and that link includes all of the DIY instructions. The one below seemed like a great idea at the time but didn't really work out for a couple of reasons. I still think the seed of the idea is good but for now you can learn from my failure.

First step: smash head

Here is where tile cutters might have come in handy. I'm the impatient type so I just grabbed a hammer, smashed the top of the head, and hoped for the best.

Wounded lady in repose

The end product lies on its side because the lady's neck prevents the thing from standing upright. I thought the head in repose would be kind of interesting, but the sand in the pincushion settles and lolls to one side. All in all very irritating. She's going back in the closet while I think this through.

Thursday, May 1, 2014

DIY Baby Head Pincushion


One day you reach for a needle and find that your old faithful pincushion has turned into an unsightly, threadbare lump.

Old faithful

Time to scrounge around the house for scraps of fabric and interesting junk to create something new. This is the first of two pincushions, both working off the same general idea. The inspiration was a rubber baby head that has been bouncing around here for a number of years. The first step - figure out how to cut off the top of the head in a perfect circle. I found a cup that was just the right size.

Draw a circle around top of head with a pen

After cutting off the top of the head I noticed the ring at the neck made the thing wobbly, so I cut that off too.

Cut off top of head and neck ring

An X-Acto cuts right through like butter

For the next step I cut a piece of velvet into a rough circle and frankly, the size of the circle is a guess. I guessed wrong the first time and had to redo it with a bigger circle. This is such a quick process that the trial-and-error sizing isn't much of a drawback. Gather the edge of the circle in a sloppy, any-old-way, large stitch and pull in so you've created a pouch (leaving plenty of thread still on the needle dangling and ready for final closure). Use a funnel to pour sand into the pouch. Test size by putting the pouch as is into the head and assessing the fit. You'll be turning the whole thing upside down for the final version. Once the size seems right, draw the pouch entirely closed - stitch back and forth through the neck of the pouch a few times to secure it, clip any extra fabric away from the top edge, and then keep stitching back and forth, overlapping and drawing in until it is entirely secure and closed off with no place for sand to leak out. Again, you can be as sloppy as you want. This part won't show.

Scrap of fabric, funnel, needle and thread, potting sand

Now turn the sandbag upside down (the stitching will be inside the head at the bottom), and stuff the thing into your head. I had planned on gluing the bag in, but that turned out not to be necessary in this case. The final product is solid, has heft, and the sand sharpens the needles as you push them in and out. Best of all, my pincushion now looks like a little assemblage piece instead of a hot mess.