Pages

Thursday, March 29, 2012

A Very Merry Un-Easter: Recyled Easter Eggs

If you celebrate Easter complete with bunnies and baskets, by the time the holiday is over you will have a bunch of those ubiquitous plastic pull-apart Easter eggs lying around. You could save them for next year or—you could recycle them into a year-round game rife with magic, mystery, exploration and discovery.

The name of the game? Eggstraordinary.

The game

Game instruction label


Materials needed: 8 plastic pull-apart eggs and one empty plastic CD container (the kind that hold 50 CDs). For a free download of a one-page PDF containing labels you can cut and paste to create your own game container, click here.

Step one: Decoupage some plastic eggs. I have used assorted paper from Chinatown for these, but use any patterned tissue paper that appeals to you. Crumpling and then tearing the paper and/or snipping along edges with scissors before gluing helps overcome the challenge of gluing onto an oval object. Note that I've used contrasting bands around the opening edges to make it neater and easier to keep the edges clear.


Eight eggs fit perfectly into a 50-disc CD container. Note that to open and close the container you turn it upside down and twist. If you try to open it while it is right-side-up, all of the eggs will fall out.

Eggs in the bin

Eggs

Eggs

And more eggs

Eggstraordinary Game Options

Delightful Surprises
Find small treasures, tiny objects, and lovely little things around your house or elsewhere and tuck them inside the eggs so you'll have them ready. When you go to someone's house, hide an egg in a place they will eventually find it (in the medicine cabinet, under a bed pillow, in the shower stall, atop a plate in the kitchen cabinet). Imagine their surprise at finding an unexpected bit of magic and mystery.


Gather and Give Away
Divide the eggs equally among the number of players. Each player should remember what their starting eggs look like (this is important). Players separate and search outside in nature for beautiful little finds - a bit of moss, an appealing twig, a nice stone, a tiny flower. They tuck their finds into their eggs. Particularly creative players can come up with complete little nature assemblages inside their eggs. 

Players regather and are instructed to go out into a designated area one by one to hide their eggs. Step three is the treasure hunt, where all players head out to hunt down the eggs. You may only gather as many eggs as you started with (e.g., if you started with two, you only gather two), and you don't gather your own eggs. When all eggs are found, players regroup for stage four. Go in rounds and have individual players open their egg finds one by one as others in the group ooh and aah over the innards.


Gather and Give Away Flea Market Variation
Follow the instructions above, but have players track down the contents of the give-away eggs at a fela market or thrift store, setting a one or two dollar limit total for all innards. Think in terms of a nice button, a single dangley earring, a vintage handkerchief, a scrap of lace.

Feel free to come up with your own Eggstraordinary game variations themed to the beach, family travel, foreign travel—the possibilities are endless.

Monday, March 26, 2012

Upcycled Men's Shirt #10 - Child's Chef Uniform

Another in the ongoing Upcycled Men's Shirt series. Here we have a single man's shirt, purchased for one dollar at a local thrift store, transformed into a chef's outfit for a three-year-old. Note that three-year-olds have large heads, out of proportion to their bodies.


The body of the apron is from the shirt back. The two strips from the front containing the buttons and the button holes have been sewn to either side of the apron. They make an interesting border and make the neck closure adjustable in length, simply by buttoning it closed with a different button. Two other strips from the front of the shirt have been used to create side apron ties.

Button strip from front of shirt sewn on side of apron
Bottom curve of original back section was trimmed off to form a straight horizontal line. The bottom was then flipped up and sewn down to create apron pockets.

Four apron pockets

Hat was created from the shirt sleeves, with the addition of two small panels of material from the shirt front to cover gaps created when bringing sleeves together. All buttons are removed from the button side of the cuffs. They are resewn to one of the buttonhole sides of the sleeve cuff, creating an adjustable fit for the hat.

Buttons placed so hat size is adjustable
The joy I derive from these upcycled men's shirt projects is the process of experimenting and noodling around, and sometimes when I'm done even I find it hard to retrace just how I put something together. This time I've drawn a rough sketch of the process for anyone who wants to try to duplicate this project.

Click on picture to enlarge

The chef in action

Pounding the dough

Tuesday, March 20, 2012

In Case of Emergency Pin

In case of emergency...

...break a heart

Friday, March 16, 2012

Visual Mashup: The Art of Play

Every once in a while as I am idly looking around my cluttered environs or sorting through my many, many baskets of assorted junk, unrelated objects seem to find each other in a perfect visual mashup. Here are some of them now. I spent an entire evening contemplating these with utter delight. They made me very happy.

mashed

unmashed

The next day a friend was visiting and I showed the mashups to him and said, "Aren't these just great?" He looked doubtful and finally said, "Well, so much of what you do seems to take a lot of time and it looks like these only took a few minutes."

Interesting. I wouldn't have thought it was necessary to state this, but apparently it is: time is not the point.

As a complete aside, I realized in retrospect that this visual mashup has a theme. The two little vases were originally intended as funerary urns for the ashes of dead goldfish as part of Your First Dead Goldfish. The vintage eraser was given to me by a friend when her father died. I have no idea where the plug came from, but of course there is the expression, "pulling the plug." So - the theme of this visual mashup seems to be death. Who knew?

Friday, March 9, 2012

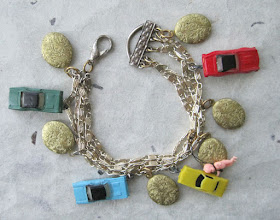
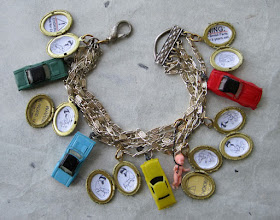
Choking Hazard Charm Bracelet

A nifty little number that incorporates the problem and the cure into one must-have accessory.

A bracelet rife with miniature motor car choking hazards.

Open the lockets to find choking hazard warnings and a complete set of Heimlich maneuver diagrams for infants


To turn a toy car into a charm: insert wire through front wheel well; twist two ends of wire together; curl twisted strand several times to form a loop

Ready for action


Saturday, March 3, 2012

Astonishingly Practical Band-Aid Earrings

These were first invented a few decades ago when a metal allergy made wearing earrings problematic, but I wanted to wear earrings anyway. These are quick and easy to make and can take off in almost any creative direction. This could also be a fun project for kids (and they are legion) who are obsessed with band-aids.

Assemble materials, including a glue stick and standard band-aids

Sort through old magazines, maps, and junk mail and clip visually interesting images. Make sure the piece you clip is larger than a band-aid

Glue band-aid face down on the wrong side of paper scrap, centering the best part of the image you want to feature as best you can so that it ends up on the padded part of the band-aid strip.

Cut out band-aid. Then trim one end as shown. This is the end that fits inside your ear. Note: the protective paper covering the adhesive part of the band-aid remains in place through all steps until you're ready to wear the band-aid.

And voila! The finished band-aid earring.

Now fold the band-aid, making firm creases at each end of the padded section.

More band-aid earrings

You may also sew on dangling objects. These earrings are part of a new series of "Choking Hazard" jewelry.

Just stitch right through the padded section of the band-aid.

Another dangle version, using a tiny rocker.

The test lab

"Off your rocker" earring on test lab ear

Choking hazard earring on the ear of an obliging male friend. Center padded section of band-aid over your earlobe. Fold narrow end of band-aid inside the ear and secure. Fold wide end of band-aid under earlobe and secure to back of earlobe.
Portrait of the artist sporting an "off your rocker" earring